Linux Ubuntu 10.04 - 10.10

ADMINISTRATOR
Učlanjen(a)
10.05.1971
Poruka
54.331
Download Manager for Ubuntu 10.04-10.10

multiget_download_manager_for_ubuntu_10_04.png


For Ubuntu 10.04 LTS ,a lot of download manager is available so it isn’t so easy to choose a good one.This post is aimed to explore about a good download manager for ubuntu 10.04.


Multiget : Download Manager recommended for ubuntu


Multiget is a free and open source download manager with easy to use and decent graphical user interface.Multiget is developed using c++ and it is a cross platform application(available for Linux/Windows/BSD/MacOS).


Features of Multiget Dwonload Manager

It has suppports for FTP/HTTP protocols,so it fullfils the requirements of most of the users.
It supports multithreading on multi server.
you can also resume downloads(Assuming that the corresponding web server supports it).
you can also increase the security by using proxy as it supports SOCKS 4,5 proxy,http proxy and ftp proxy.
Now it supports P2SP(Capability of combining different files downloaded from multiple servers)


How to Install Multiget Download Manager in Ubuntu 10.04-10.10


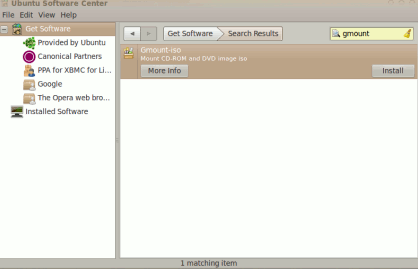
In Ubuntu 10.04 it can be installed in few clicks by using software center or synaptic package manager.Go to Software center and search for multiget then click on install.It may ask for the password.Then enter your account(Ubuntu 10.04 login account) password;then installation will begin and complete within few seconds.Now you are ready to enjoy high speed downloading by using multiget.You can start it from Applications->Internet->Multiget.
If you are running other distro of linux then you may like to download and install it mannualy from its afficial site.

Download Multiget
 
ADMINISTRATOR
Učlanjen(a)
10.05.1971
Poruka
54.331
ubuntu 10.04-10.10 brightness control

ubuntu_1004_brightness_control.jpg


Control Brightness of your monitor by using gddccontrol.GDDCcontrol is nothing but the DDCcontrol along with the Gnome based Graphical User Interface(GUI).ddccontrol is a simple tool that is very useful in controlling monitor parameters – like brightness,contrast.. without using the On Screen Display and the buttons in front of the monitor.

Install GDDCcontrol or DDCcontrol in Ubuntu10.04/10.10/9.10/..

#1. Open Synaptic Package Manager and search for “gddccontrol” and mark the result(check the left box and click on mark when small window appears) for installation.

#2. Then click on Apply to install the package.

#3. Wait…. installation will complete within moments..

#4. That’s All…

Installing GDDccontrol from command line

Simply type the following command and enter your login password -

sudo apt-get install gddccontrol

Running GDDCcontrol on Ubuntu 10.04(Lucid Lynx)

To run gddccontrol simply run the command at terminal-

rkjha@rkjha-desktop:~$ gddccontrol
 
ADMINISTRATOR
Učlanjen(a)
10.05.1971
Poruka
54.331
How to Install GnuCash on Ubuntu

GnuCash, a Finance Management software is free and open source accounting software for Ubuntu.Gnucash is a cross-platform tool for managing bank account transactions and online stocks. On Ubuntu 10.04 or in older versions like 9.10 you can install Gnucash in many ways e.g from ubuntu terminal or shell as well as from Synaptic Package Manager or Ubuntu Software Center.


install_gnucash_on_ubuntu.jpg


Install GnuCash from Command Line

Open terminal CTRL+ALT+T or Applications->Accessories->Terminal.Then Type the command -
sudo apt-get install gnucash
Then enter user login password and type “y” to continue.Wait until the installation is complete
Install Gnucash from Ubuntu Software Center

Open Ubuntu Software Center from Applications and search for “gnucash”.Then click on install to begin installation(You may have to authenticate ).It will complete within few minutes.You can open GnuCash from Applications->Office->GnuCash Finance Management.
 
ADMINISTRATOR
Učlanjen(a)
10.05.1971
Poruka
54.331
new features of ubuntu

new_look_of_ubuntu_10_beta.png


Mozilla firefox : ubuntu 10.04 beta came with the latest verson of mozilla firefox 3.6 ,and the default search engine is yahoo.


Desktop : ubuntu 10.04 beta lts came with the latest verson of GNOME desktop(as default) with some new features and programs.


Linux-cernel : it has come with 2.6.32-16.25 kernel.


Hal removal : the ubuntu 10.04 came with the support of full removal of hal fr0m the booting steps,hence the boot process will become more faster and it will become easy to resume in the case of suspend.


New charming themes : Two new themes ambiance and radiance has added along with some new wallpapers and icons.


New indicators : Some indicators has added to make the notification process more consistent and well designed & optimised for session management works,communication and other tasks.
 
ADMINISTRATOR
Učlanjen(a)
10.05.1971
Poruka
54.331
Enjoy twitter in ubuntu 10.04-10.10 using gwibber

twitter_using_gwibber.png


You know beta version of the ubuntu 10.04 LTS has released earlier and final version will be released on April 29 2010 and it will be supported till 2013.Many changes and improvement has been made in Lucid Lynx(the name of the ubuntu 10.04 version).
Now you can use your favorite micro-blogging site very easily ..as the lucid lynx came with gwibber which is installed by default in the standard ubuntu distribution package.Gwibber is microblogging client for all the popular micro blogging sites like Twitter.Hence you can easily enjoy tweeting fr0m your desktop just by clicking gwibber.Although gwibber has support for all other major microblogging sites.


Currently supported microblogging sites :


*Twitter
*Qaiku
*Pownce
*Flickr
*StatusNet
*Identi.ca
*Digg
*Facebook
*Friendfeed
 
ADMINISTRATOR
Učlanjen(a)
10.05.1971
Poruka
54.331
How to install adobe reader(for PDF File) on Ubuntu 10.04-10.10

adobe.jpg


Ubuntu 10.04(Lucid Lynx) has already a default e-book or pdf Reader – Document Viewer(Which is probably sufficient for most of the users) but even though you want Adobe Reader – Acroread for Ubuntu 10.04 Then this post will help you in installing Adobe PDF reader on your PC.
Actually Adobe reader has added recently in to the Repository Package or you may say Synaptic Package Manager,which makes your task much easier.Although it’s no different matter that you can also install adobe reader more quickly with one simple commands.Other possible ways to install adobe reader might include Ubuntu Software Center,which contains all the common useful applications grouped and categorized so that an average user can easily manage applications on Ubuntu 10.04.


install_adobe_reader_on_ubuntu_10_04.jpg


Install Adobe Reader 9 from Synaptic Package Manager

#1. Open Synaptic Package Manager(Go to System->Administration->S-P-M).
#2. Then search for “adobe reader” or “acroread” and check the left box for installation.
#3. Next,Click on Apply to install adobe reader on your ubuntu 10.04 lucid lynx.
#4. Wait…(~10 minutes)until the installation will complete.In the end will it will ask you whether you want to set the Adobe as Default PDF reader or not,choose YES if you want else NO if you don’t.
#5. Now you are ready to view or print pdf files using Adobe Reader…Right click on any pdf files and then open with Adobe Reader 9.
Install Adobe Reader from Command Line

Open terminal from Applications->Accessories->Terminal and type the command -(And enter your login password if prompted)..

sudo apt-get install acroread
 
ADMINISTRATOR
Učlanjen(a)
10.05.1971
Poruka
54.331
Ubuntu 10.04-10.10 – Firefox Default search engine switched to Google

ubuntu_10_04_hacks.jpg


Some months ago canonical decided to change the default search engine in mozilla firefox from Google(In the ubuntu 9.10 version) to yahoo(For the next version i.e Lucid Lynx).So
in the beginning of ubuntu 10.04 Lucid Lynx beta release the default search engine in the mozilla firefox was switched to yahoo from Google.After some week it was decided that the default search engine will be google,and the changes will be made before 15th april.Hence in the final stable release(April 29,2010) Google will be the default search engine for mozilla firefox.I am trying ubuntu 10.04 beta version on my personal computer.When I updated my system on April 14,2010 My default search engine in the Mozilla firefox has changed to Google.
 
ADMINISTRATOR
Učlanjen(a)
10.05.1971
Poruka
54.331
how to install webmin on ubuntu 10.04-10.10 server

Webmin is a web based interface to administrate unix/linux system locally or remotely.You can use any modern web browser e.g firefox to configure and set up user accounts,Apache server,DNS(Domain Name System) like BIND DNS Server,File Sharing permissions,Firewalls,backup configuration,cluster copy files &packages,HTTP Tunnel,VPN,Jabber IM,Linux RAID,MIME Type,Log File Rotation,Scheduled Cron Jobs,bandwidth monitoring …and many other things.So you don’t need to manually edit the unix/linux configuration files e.g /etc/passwd ..and lets you to manage remotely or from console.


webmin_snapshot.jpg


Installing Webmin in Ubuntu 10.04 Lucid Lynx

#1. First install these dependencies either from command line(terminal) or package manager.
libapt-pkg-perl
apt-show-versions
libauthen-pam-perl
libio-pty-perl
libnet-ssleay-perl

Type the following command :

sudo apt-get install package_name

OR in synaptic package manager search for the package name;mark it and click on apply to install it.


#2. Now,download webmin from the link given below.


Download Webmin


#3. Install it by rightclick->open with Gdebi package Installer(OR just double click on it);then a new window will appear click on Install Package.
OR install it manually by using the command given below-
dpkg -i webmin_1.510-2_all.deb
 
ADMINISTRATOR
Učlanjen(a)
10.05.1971
Poruka
54.331
install wicd network manager on ubuntu 10.04-10.10

Wicd is an open source and free – wireless network manager for Linux based operating system e.g Ubuntu 10.04(Lucid Lynx).Wicd has simple and easy to use graphical user interface and a lot of options to configure your wireless network connectivity.Some of the best features of Wicd is -

  • Full Featured graphical and console interface
  • No graphical dependencies,that’s why it’s independent of Ubuntu desktop i.e wicd can be install in KDE(kubuntu),GNOME,XFCE..
  • It can establish Wired(Ethernet only) and wireless network(s).
  • Compatibility with Wireless tools.
  • It displays a tray icon for network activity and signal strength.
  • supports for many Encryption(WEP/WPA..) schemes.
install_wicd_network_manager_on_ubuntu_10_04.png

Installing Wicd Network Manager on Ubuntu 10.04

Wicd can be installed on Ubuntu 10.04 ..in a number of ways – from Synaptic Package Manager ,ubuntu software Center or from Terminal.
install wicd on ubuntu from Synaptic Package Manager

#1. Open Synaptic Package Manager and search for “wicd”.
#2. Then mark the box(In the row which is related to wicd) and click ok to select dependencies(If asks).
#3. Then click on Apply in SPM to install wicd in ubuntu.Then wait until the installation is complete..
#4. That’s all …you have installed Wicd on your ubuntu 10.04 -Lucid Lynx successfully..
Installing Wicd using command Line/Terminal- Ubuntu 10.04

Type following command on terminal -

sudo apt-get install wicd

Using Wicd in Ubuntu 10.04(Lucid Lynx)

To open/configure Wicd ,go to Applications->Internet->Wicd.
 
ADMINISTRATOR
Učlanjen(a)
10.05.1971
Poruka
54.331
How to Mount CD-DVD ISO Image in Ubuntu 10.04-10.10

ISO image is actually an archive file of an optical disc with ISO 9660 file system(UDF file system is also supported with ISO image),so it is also known as CD image or DVD image or Disc image.ISO image files have an extension of .iso which contains merged files in uncompressed state.By using software or tools you can easily mount the ISO images on your computer.On Ubuntu 10.04 there is one such tool – Gmount-iso.
Gmount-iso

Gmount-iso is a simple and Light application written in PyGTK and Glade.It is aimed to make the iso image mounting process much easier.Actually it is a front-end application of linux command that is used to mount iso images.The command is


mount -o loop -t iso9660 image_name.iso /mountpoint


gmount-iso_for_ubuntu.png


Install Gmount-iso on Ubuntu

install_gmount_on_ubuntu_for_iso.png


1. Open Ubuntu Software Center from Applications or Ubuntu Control Center.
2. Then,search for “gmount” and click on install.
3. Wait for installing process to complete,it will take less than a minute.
4. To start mounting iso images open Gmount from Applications->System Tools->Gmount-iso.


Conclusion : Gmount-iso is a very small application with few basic features,for more advanced features you can use Daemon Tools but currently it is available For Microsoft Windows only.
 
Natrag
Top