Linux Ubuntu 10.04 - 10.10

ADMINISTRATOR
Učlanjen(a)
10.05.1971
Poruka
54.331
How to Play ARF file on Ubuntu 10.04-10.10-Linux

Play ARF file by Converting them to mp4


ARF i.e Advanced Recording Format is a format recorded by NBR(Network Based Recording).For Ubuntu or other Linux versions currently no player is available which can play .arf files i.e WebEx(Player used to play and convert arf and wrf formats) is not supported on Linux based system or Ubuntu 10.04.That’s why to play arf file only one option is available and that is to convert the arf format to mp4 or swf or other simple formats.So you can use a converter tool “NBR2MP4″ to generate mp4(That we can play Using VLC player) file from arf.


Playing ARF format by converting them to mp4 : Ubuntu 10.04 ,Linux based systems

NBR2MP4 is a simple tool and converter that can be used to convert arf formats to mp4 formats.You can install it from command line in few steps(It’s very simple).


Download arf converter for Ubuntu 10.04 and other Linux distros

download nbr2mp4 for ubuntu


Install ARF converter on Ubuntu 10.04 or on linux


1. After downloading the nbr2mp4.tar file,extract it to any directory e.g extra_softwares.It will create a directory nbr2_mp4 and a script file nbr2mp4.sh.
2. Then Make the file nbr2mp4.sh executable by typing this command on the terminal-

rkjha@rkjha-desktop:~/extra_softwares$ chmod +x ./nbr2mp4.sh


3. Next,Install the converter by typing the command-

rkjha@rkjha-desktop:~/extra_softwares$ ./nbr2mp4.sh


Type the directory where you want to install the software[/home/rkjha/extra_softwares]:
Extracting files…
Installation is complete.


When it will ask “Type the directory where you want to install….” then just hit enter to install in the current directory(extra_softwares).


4. That’s All…You have installed the arf to mp4 converter successfully..
Converting ARF format to MP4: Ubuntu-Linux


Now,first go to the directory nbr_2mp4 created in extra_softwares(The Directory where you installed the nbr2mp4).next,use the following command to convert format-

./nbr2mp4 SOURCE [MP4-DIRECTORY] [FPS]


Where SOURCE means the name of the arf file which you want to convert and don’t forget to specify pathname if it is in the different directory.MP4-DIRECTORY stands for the output file i.e filename.mp4,it’s name will be same as arf file except the extension of .mp4(Use ./ to generate in the same directory as of input file).In FPS(Frame Per Second) field you can specify between 3 to 10(Default value is 5).The quality of the mp4 file(output file) is directly proportional to the FPS.
e.g


rkjha@rkjha-desktop:~/extra_softwares/nbr2_mp4$ ./nbr2mp4 tutorial1.arf ./ 8
Converting /home/rkjha/extra_softwares/nbr2_mp4/tutorial1.arf to /home/rkjha/extra_softwares/nbr2_mp4/./tutorial1.mp4
Retrieving video data, fps=8…
 
ADMINISTRATOR
Učlanjen(a)
10.05.1971
Poruka
54.331
how to take screenshot in ubuntu 10.04-10.10

ksnapshot_for_ubuntu.png


In ubuntu 10.04 distribution package there is one software i.e installed by default(In accessories) called- “Take Screenshot” with some basic features,can be used to take screenshot.Suppose you want to take screenshot for some selected region then you start annoying with this.One week ago,while I was messing around software center,a new software Ksnapshot came into the mind.I installed it and Now I think this is what I was looking for weeks.Ksnapshot is an excellent software I recommend you to use it for taking snapshots and enjoy.It is better not only in features but it is also more stable then the “Take Screenshot”.
 
ADMINISTRATOR
Učlanjen(a)
10.05.1971
Poruka
54.331
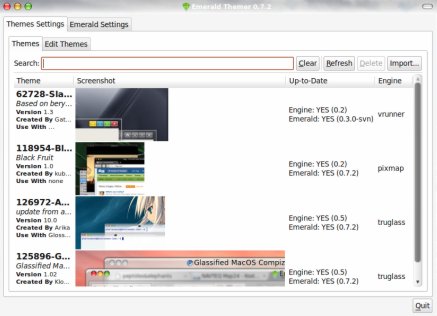
emerald themes for ubuntu 10.04-10.10

First you need to install the emerald theme manager in Ubuntu 10.04.After installing emerald theme manager you can install themes(which is available free and available for download) for different windows effect from the given download links-
Download Emerald themes


download Link1

download Link2


emerald_themes_for_ubuntu.jpg

How to Install Emerald Themes in Ubuntu 10.04

#1. Open emerald theme manager from System->Preferences->Emerald Theme Manager.
#2. Now click on import and browse to the directory where you have saved the themes(download link is given above) and click on Open.
#3. Then select the Theme and change the windows effects.(If emerald is not running then run


emerald –replace


command in ubuntu terminal).
 
ADMINISTRATOR
Učlanjen(a)
10.05.1971
Poruka
54.331
How to Increase the speed of Firefox Browser

Mozilla Firefox is one of the most popular browser on the Internet.It is open source and Free.It is available for all operating systems like Linux based(Ubuntu 10.04),windows,MacOSX …So This post will try to explain about a trick you can use on Firefox browser to increase the page loading speed.The trick is based on the concept of HTTP Pipelining.


What is HTTP Pipelining?

(Those users who just want to know about trick may skip this part)
HTTP(Hypertext Transfer Protocol) Pipelining is a simple technique by using that more than one HTTP requests are send to a single socket.It is supported in HTTP/1.1(IT isn’t supported in HTTP/1.0).It all happens due to the fact that ,several HTTP request can be fitted in the same TCP(Transmission Control Protocol) packet so the total number of TCP packets sent on the Internet is reduced and thus result in less load on network.


Why Browsing Speed Increases?

Without HTTP Pipelining ,HTTP requests are sent out in successive order i.e one after another but If we use HTTP Pipelining then the request can be sent to the server more quickly that’s why the page loading time will decrease.Therefore the browsing speed will increase and surfing become faster with Firefox browser.


Speed Up Mozilla Firefox Browser

To utilize HTTP Pipelining,what you have to do is to just enable the HTTP pipelining in Firefox because it is disabled by default in Firefox version 3(or in greater version,It may not be supported in older versions,if so then first upgrade your browser).

Step1 : Open Firefox Browser and Type about:config in Address Bar and hit enter.

step2 : Now type network.http.pipelining in Filter box

Before Changing the Settings(Firefox Browser),it was like this -

how_increase_the_speed_of_firefox_browser.png


step3 : Change the value field of network.http.pipelining,from False to True(By Double Clicking on it).

Step4 : change the value field of network.http.pipelining.maxrequests from 4 to 8(or more).

step5 : You may like to change or not in third field,actually it is for servers that uses SSL.If you want then change it to true leave it untouched.

After Changing the Settings(Firefox Browser) , Now looks like -

speed_up_firefox_browser.png


Step6 : That’s All..You are Done!! Enjoy Surfing Faster on Firefox Browser..
 
ADMINISTRATOR
Učlanjen(a)
10.05.1971
Poruka
54.331
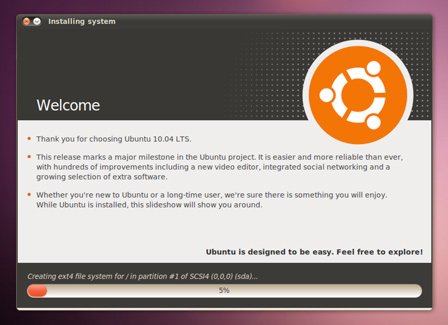
How to install ubuntu 10.04-10.10 from usb stick

Installing Ubuntu 10.04(Lucid Lynx) LTS by using Pen(USB)-drive

Ubuntu 10.04 Lucid Lynx can be installed by using live CD or USB or other methods.Procedure are almost same except in USB-stick method first you have to create USB installer for Ubuntu 10.04.You can do it by using a simple application “Universal USB Installer”.It is available for windows operating system.If you are a Ubuntu user then you can easily create USB startup disk from System->Administration->Startup Disk Creator.If you are using windows XP/Vista/7 then you can follow the steps (explained below) –


install_ubuntu_10_04_from_usb_stick.jpg


1. First,Download Ubuntu 10.04 ISO file from it’s official website.

Download Ubuntu


2. Download USB installer to create bootable USB-stick(Download Link is given below


Download USB Installer


3. Then click on Run when you will be prompted.If any security dialog appears then confirm by clicking on run.Next Read the license agreement and click on “I Agree” to continue.


4. Next,Insert a USB stick(Pen-drive) having a minimum memory space of 2GB.


5. Now,select the Ubuntu Desktop(or other) addition from DropDown List.


6. Click on ‘Browse’ and open the downloaded ISO file.


7. Choose the USB stick/drive and click on create and also check the box to format usb stick.


8. Withion few minutes the process will complete.Then restart the computer and boot it from USB stick(If your computer doesn’t boot from USB stick then edit the BIOS settings) and install it to your hard-drive.


9. Then,select the drive/partition in which you want to install Ubuntu 10.04(If you want to make your computer Dual Boot) or just erase(and use) the entire disk(In this case windows vista/7 will be removed completely) and install Ubuntu 10.04 Lucid Lynx.Enter the login details and click on install to continue.It will hardly take 30 minutes.Restart your computer.That’s All.
 
ADMINISTRATOR
Učlanjen(a)
10.05.1971
Poruka
54.331
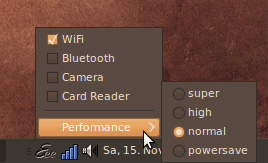
How to install eee-control on ubuntu 10.04

eee-control is a simple and easy to use application to control computer hardware under ubuntu 10.04 or other linux based operating system.Eee-control can easily switch(Bluetooth,WiFi,..etc) on and off and allows you to configure hardware hot-keys,high power-saving mode in few clicks.Other important features includes performance control(By adjusting FSB and CPU voltages) for saving power or over-clocking,Hardware sensors(Temperature,Fan) can be easily monitored,notifications,better fan control.


install_eee-control_on_ubuntu_10_04.png


Install eee-control on Ubuntu 10.04(Lucid Lynx)

1. First Download the Debian Package(*.deb) from the link given below.

Download eee-control


2. Open it with Gdebi Package Installer by Right clicking on the saved file and then select Open with Gdebi Package Manager(OR just double click on the file OR after clicking on the above download link,choose the option that says -open with Gdebi package installer).


3. Then click on Install Package(Then you may have to enter your login password to proceed) and wait until the installation would complete(It won’t take more than a minute).


4. That’s All… You have installed eee-control successfully on your ubuntu computer.


Install eee-control from command line

To install eee-control from ubuntu terminal or shell run following commands in terminal(To open terminal hit CTRL+ALT+T)


sudo add-apt-repository ppa:eee-control


sudo apt-get update


sudo apt-get install eee-control


Using eee-control in Ubuntu

You can open eee-control from Applications->System Tools->Eee Control.Then configure the Eee-control settings as you want.
 
ADMINISTRATOR
Učlanjen(a)
10.05.1971
Poruka
54.331
how to install gyachi on ubuntu 10.04-10.10

Gyachi for Ubuntu 10.04 Lucid Lynx

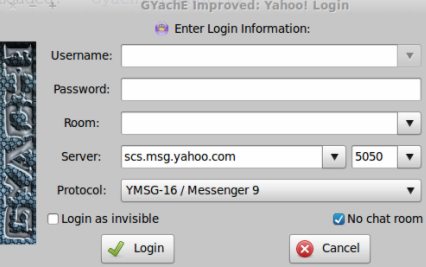
Gyachi application is a fork from Gyach Enhanced yahoo Client for Linux based operating system.Gyachi is based on yahoo instant messenger protocol.Gyachi’s user interface is based on GTK+ version-2 and it’s aim is to provide all the features that is available in windows yahoo messenger client.It has a lot of features like Voice-chat,nicknames,webcams,avatars,images and many more.


install_gyachi_on_ubuntu_10_04.jpg


install Gyachi in ubuntu 9.10/10.04/10.10

On Ubuntu 10.04 you can either install it from Synaptic Package Manager after adding the Package address or from command line.Here both the methods are explained choose whatever you like.


Installing Gyachi from Synaptic Package Manager

1. Open Synaptic Package Manager and enter the login password(If asks).


2. Then click on Settings->Repositories->Other Software.


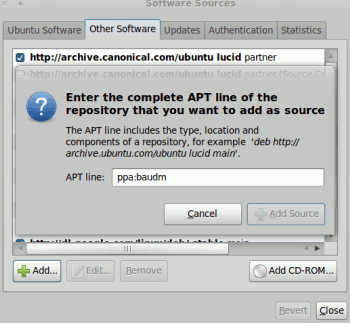
3. Next,click on +Add and enter the following value in box which says APT line

ppa:baudm

Then,click on +Add Source.


installing_gyachi_in_ubuntu.png


4. Next,close the current window and click on Reload button in Synaptic Package Manager.


5. Now,search for gyachi in quick search bar of synaptic package manager;Mark the box for installation(Select the dependencies by clicking on ok if necessary) and click on Apply to install gyachi.Installation will complete within a minute.


Installing Gyachi from Command Line

1. open terminal from Applications->Accessories->Terminal or hit CTRL+ALT+T.
Then Type the following command -


sudo add-apt-repository ppa:baudm


sudo apt-get update


sudo apt-get install gyachi


Using Gyachi in Ubuntu 10.04

Open Gyachi – improved from Applications->Internet->GYachE Improved.
 
ADMINISTRATOR
Učlanjen(a)
10.05.1971
Poruka
54.331
Linux Kernel version 2.6.34.1 Now available for download

linux_logo.gif


On July 05,2010 the new kernel 2.6.34.1 of Linux was released.The changes made in this version can be summarized as-
Total no of files added OR deleted is equal to zero
Total number of files changed is equal to two hundred and twenty nine.
Total number of lines added is equal to two thousand three hundred and twelve.
Total number of lines changed is equal to one thousand seven hundred and fifty one.
Total number of lines deleted is equal to one thousand one hundred and thirty four.

Download linux kernel 2.6.34.1
 
ADMINISTRATOR
Učlanjen(a)
10.05.1971
Poruka
54.331
KDevelop for Ubuntu 10.04-10.10

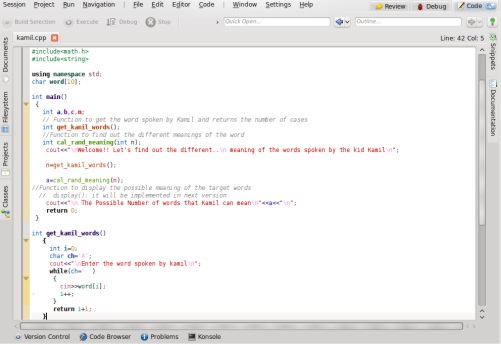
kdevelop_snapshot.jpg


After completing the installation procedure of Ubuntu 10.04 Lucid Lynx,I had finished installation of some Ubuntu extras like Adobe Flash,VLC,Google Chrome ..and so on.Then I searched for my favorite C++ IDE – KDevelop but it wasn’t there either in Ubuntu software center or Synaptic Package Manager.Then how can we install KDevelop on Ubuntu 10.04,well it’s very simple and how?that’s the purposes of this post.Later I found that KDevelop can be installed in three simple steps by changing Repository settings in SPM.
Installing KDevelop on Ubuntu 10.04 Lucid Lynx

#1. Open Synaptic Package Manager and click on ‘Settings->Repositories’.A new window (named as software sources) will open,then click on tab which says ‘Updates’ and check the box for ‘Unsupported updates’(close the current window).


#2. Now click on Reload(Since repository settings have changed) to update the software listings and search for ‘kdevelop’;then mark the packages for installation and finally click on Apply(click OK if it asks for dependent libraries/API) to install KDevelop.


#3. Wait…….for few moments until the installation is completed.That’s All! Open kdevelop from Applications->Programming->KDevelop and Enjoy the FUN! of programming.
 
ADMINISTRATOR
Učlanjen(a)
10.05.1971
Poruka
54.331
how to install inkscape on ubuntu

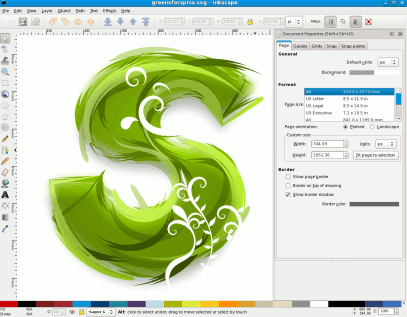
This post is published to explain – how to install inkscape in ubuntu 10.04/9.10/..with a small tour to introduce with inkscape and it’s features.Inkscape is an open source and free vector graphics editor with the features equivalent to adobe illustrator,coreldraw or xara x by using the SVG(Scalable Vector Graphics) format,the standard vector graphics format defined by W3C.Inkscape also support many advanced SVG features like markers,clones,alpha blending …. in the sophisticated Graphical Interface.


Installing Inkscape on Ubuntu 10.04(Lucid Lynx)/9.10/..

inkscape_snapshot.png


Install Inkscape from Command Line

Open the terminal from Applications -> accessories -> Terminal.Now run the following command as root(Use Sudo (or su) to gain temporary root power)


$ sudo apt-get install inkscape

Install Inkscape from Synaptic Package Manager

#1. Open SPM(System -> Administration -> SPM) and search for “inkscape”.


#2. Mark(select ok if asks for dependencies) the necessary packages for installation.


#3. Now,click on Apply to begin installation process…and wait until the process complete..


#4. That’s all…you have installed the Inkscape successfully on your Ubuntu Computer.


Using Inkscape : Go to Applications -> Graphics ->Inkscape.
 
Natrag
Top