Linux Ubuntu 10.04 - 10.10

ADMINISTRATOR
Učlanjen(a)
10.05.1971
Poruka
54.331
Ubuntu 10.04-10.10 wallpapers

Here is three best Wallpaper for Ubuntu 10.04 and you can also download the whole collection FREE from the link given in this post.


1. JK Bridge at Night

jk_wallpaper_for_ubuntu_10_04.jpg


Download This Wallpaper


2. Flower Drops

wallpapers_flower_ubuntu.jpg


Download This Wallpaper


3. Reflecting Clouds Near Beach

wallpaper_clouds_ubuntu.jpg


Download this Wallaper


If you want to download more wallpapers for free then link is given below.First one zip(No password is required) file contains 4 wallpapers for all in different resolution while second zip(Not protected by password) contains more than 140 wallpapers(Including the above three wallpapers).


Download Best Wallpapers Collection FREE (6.7 MB)

Download Best Wallpapers Collection FREE (170.2MB)
 
ADMINISTRATOR
Učlanjen(a)
10.05.1971
Poruka
54.331
How To Learn Ubuntu-Linux Commands

Learning bash/zsh/ssh shell commands is not so complex and boring as it seems.In fact when you will start learning bash shell commands then its initial steps may looks ugly but when you will have some basic idea about commands then afterwards you will feel a keen interest in learning further commands.Working on command line interface is really have its own taste and significance even though in high graphical environment era.In linux ubuntu, if you want to do some admininstrative task which is related to the information contained within the system files,then you can’t do that directly;the reason behind this is- all the users of the linux have some restricted access by default.If you want to finish that administrative task then you will have to login as a root user,which is really not so simple in linux because of the linux ubuntu security policy(That’s why linux operating system is secure by default in compare to other operating system like windows where a five year child can corrupt the whole system by deleting a system file).In other ways you can finish such administrative task by using command line in few minutes,by gaining the temperory root power using sudo command followed by the user account password.


bash1.png

To learn the basic/advanced linux-ubuntu bash shell commands simply follow these basic steps :


STEP1 : Learn some simple bash-commands then Open the bash/terminal from Application=>accessories=>terminal or use CTRL+ALT+F2 to open a virtual console(Return to the graphical interface by pressing CTRL+ALT+F7).


STEP2 : For more details on any command just type help command_name(about which you want to know more),bash itself is a great place to learn more about commands and their parameters.


STEP3 : Try to use the commands frequently that you learned.


STEP4 : That’s all ! Enjoy learning about the commands.. and for more info and tutorial on the ubuntu-bash commands visit the next posts,which contains
step wise tutorial and tips on bash-commands in linux
. For any problems or discussions you may use sudobits forum, a hacking community.
 
ADMINISTRATOR
Učlanjen(a)
10.05.1971
Poruka
54.331
bash commands tutorial

Learning some advance bash commands(Related to network) in bash isn’t a bad idea if you are going to troubleshoot networking problems or you are interested in other network hacks.Although you can do it in ubuntu 10.04(In some older versions too) by using a special tool named Network Tools which allows you to execute these commands in graphical mode.It can be found at system -> administrator -> Network Tools.But if you know some basic commands related to networking then it will be better.It is very simple and you can learn it within minutes.Here is the simple bash commands tutorial part 4…(If you don’t know about some simple bash commands then first read here..Bash commands for beginners )
Ping Command :

It is one of the most used commands in network testing and management.You need to know either ip address or host name of the target.The result of the ping command can be use to decide whether the target host is alive or not.The syntax of the command is ping, followed by its address(host name or IP address).
ping zzz.zzz.zzz.zzz or ping www.yourtargetdomain.com
e.g

user@user-desktop:~$ ping www.yourtargetdomain.com
PING yourtargetdomain.com (hhh.hhh.hhh.hhh) 56(84) bytes of data.
64 bytes fr0m ubuntu.xyz.net (hhh.hhh.hhh.hhh): icmp_seq=1 ttl=49 time=287 ms
64 bytes fr0m ubuntu.xyz.net (hhh.hhh.hhh.hhh): icmp_seq=2 ttl=49 time=269 ms
64 bytes fr0m ubuntu.xyz.net (hhh.hhh.hhh.hhh): icmp_seq=3 ttl=49 time=272 ms
64 bytes fr0m hhh.hhh.hhh.hhh: icmp_seq=4 ttl=49 time=270 ms
64 bytes fr0m ubuntu.xyz.net (hhh.hhh.hhh.hhh): icmp_seq=5 ttl=49 time=287 ms
64 bytes fr0m ubuntu.xyz.net (hhh.hhh.hhh.hhh): icmp_seq=6 ttl=49 time=269 ms
64 bytes fr0m ubuntu.xyz.net (hhh.hhh.hhh.hhh): icmp_seq=7 ttl=49 time=269 ms
64 bytes fr0m ubuntu.xyz.net (hhh.hhh.hhh.hhh): icmp_seq=8 ttl=49 time=271 ms

Netstat Command :

Netstat is very useful in printing the network connections,routing tables,network interfaces and multicast memberships.It has many advanced features that can be easily used by providing some options.Without any options it will display the list of open sockets.You can change the output by supplying options.


user@user-desktop:~$ netstat
unix 3 [ ] STREAM CONNECTED 9375 /home/user/.pulse/4f3877f89c59bcc05dbe2e5b4bb73a69-runtime/native
unix 3 [ ] STREAM CONNECTED 9374
unix 3 [ ] STREAM CONNECTED 9366 @/tmp/dbus-9GBsy9S5kY
unix 3 [ ] STREAM CONNECTED 9365
unix 3 [ ] STREAM CONNECTED 9322 /tmp/orbit-user/linc-5bc-0-6d4236a1652a7
unix 3 [ ] STREAM CONNECTED 9321
unix 3 [ ] STREAM CONNECTED 9320 /tmp/orbit-user/linc-602-0-19533f015c325
unix 3 [ ] STREAM CONNECTED 9316
unix 3 [ ] STREAM CONNECTED 9319 /tmp/orbit-user/linc-5fe-0-228e9d0f69c08


To display about kernel routing tables put -r , to know about the interfaces use -i and if you want the detailed statistics of each protocol then it is preferable to use -s.
e.g :

For Information about Interface :Using -i

user@user-desktop:~$ netstat -i
Kernel Interface table
Iface MTU Met RX-OK RX-ERR RX-DRP RX-OVR TX-OK TX-ERR TX-DRP TX-OVR Flg
eth0 1500 0 671613 0 0 0 671024 0 0 0 BMRU
lo 16436 0 103806 0 0 0 103806 0 0 0 LRU

For routing tables :
user@user-desktop:~$ netstat -r
Kernel IP routing table
Destination Gateway Genmask Flags MSS Window irtt Iface
192.168.1.0 * 255.255.255.0 U 0 0 0 eth0
link-local * 255.255.0.0 U 0 0 0 eth0
default 192.168.1.1 0.0.0.0 UG 0 0 0 eth0


Detailed statistics of protocol using -s

user@user-desktop:~$ netstat -s


Ip:

723094 total packets received
2 with invalid addresses
0 forwarded
0 incoming packets discarded
723053 incoming packets delivered
723066 requests sent out


Icmp:

367 ICMP messages received
2 input ICMP message failed.
ICMP input histogram:
destination unreachable: 353
source quenches: 14
69 ICMP messages sent
0 ICMP messages failed
ICMP output histogram:
destination unreachable: 69


IcmpMsg:

InType3: 353
InType4: 14
OutType3: 69


Tcp:

18586 active connections openings
6738 passive connection openings
3445 failed connection attempts
1310 connection resets received
13 connections established
711836 segments received
696851 segments send out
14235 segments retransmited
18 bad segments received.
7544 resets sent


Udp:

17343 packets received
69 packets to unknown port received.
0 packet receive errors
18471 packets sent


Options :

[-v] : To display some information about unconfigured address families.
[-n] : It will show the numerical address.
[-p] : To show the PID and name of the program to which each socket belongs.
[-l] : It will display only listening sockets.
[-c] : This will result in displaying the particular(selected) information every second continuously.
[-C] : Use to printing routing information fr0m its route cache.
Traceroute :

It is one of the most widely used commands,helpfull in tracing the route fr0m the a sender to a destination host.Actually it works by using TTL field of the IP protocol.For performing a trace the only required parameter is IP address or host name.There are many options available , some are desribed below.


Options :


[-I] : It uses ICMP(Internet control message access protocol) echos for probing.
[-T] : It uses TCP(Transmission control protocol) SYN for probes(Requires root power,so if you are not in root mode then start the command with sudo).
[-d] : It will enable the socket level debugging(If it is supported by your linux kernel).
[-F] : To prevent the fragmentation of the probe packets.
For Example : Tracing without any options

user@user-desktop:~$ traceroute www.yourtargetdomain.com
traceroute to www.yourtargetdomain.com (hhh.hhh.hhh.hhh), 30 hops max, 60 byte packets
1 192.168.1.1 (192.168.1.1) 1.204 ms 1.718 ms 2.220 ms
2 ABCD-XX-Static-rrr.rrr.rrr.rrr.wxybroadband.in (FFF.FFF.FFF.FFF) 19.496 ms 22.417 ms 25.827 ms
3 ABCD-XX-Static-rrr.rrr.rrr.rrr.wxybroadband.in (FFF.FFF.FFF.FFF) 21.537 ms 21.979 ms *
4 BBB.BBB.BBB.BBB (WWW.WWW.WWW.WWW) 29.870 ms 30.267 ms 33.412 ms
5 CFS-Static-NNN.NNN.NNN.NNN.mywxy.in (MMM.MMM.MMM.MMM) 260.056 ms 263.774 ms 266.282 ms
6 STWQLiteEthernet8-4.ar7.MNX1.dgyw.net (KKK.KKK.KKK.KKK) 265.844 ms 237.168 ms 424.466 ms
7 QQQ.QQQ.QQQ.QQQ (TTT.TTT.TTT.TTT) 267.514 ms 267.996 ms 268.273 ms
8 ek-dn2-core3-te9-1.rtr.ijkl.com (209.59.157.224) 274.020 ms 278.394 ms 280.310 ms
9 YYY.YYY.YYY.YYY (PPP.PPP.PPP.PPP) 281.858 ms 284.450 ms 285.917 ms
10 SSS.SSS.SSS.SSS (SSS.SSS.SSS.SSS) 290.453 ms 291.939 ms 298.095 ms
11 ubuntu.xyz.net (hhh.hhh.hhh.hhh) 301.548 ms 303.444 ms 303.724 ms


For more details on traceroute type : info traceroute in your bash shell.Actually you can learn bash commands fr0m the bash shell.Just type help command name or info command name or –help command name.
 
ADMINISTRATOR
Učlanjen(a)
10.05.1971
Poruka
54.331
Learning bash-commands- tutorial-2

An easy way to learn linux commands-tutorial-2


1. pwd command : To see the current working directory use pwd command.
SYNTAX : pwd
rk10@rk-desktop:~$ pwd
/home/rk10
rk10@rk-desktop:~$
#For more information on cd command just type help cd ,in your bash shell.


2.cp command : It is used for copying the files from one directory to another.Here I am copying the file xyz.txt from home directory to the desktop.


SYNTAX : cp filename destination
rk10@rk-desktop:~/Desktop/test$ ls #test directory is empty at this time
rk10@rk-desktop:~/Desktop/test$ cd ../
rk10@rk-desktop:~/Desktop$ cp xyz.txt /home/rk10/Desktop/test
rk10@rk-desktop:~/Desktop$ cd test
rk10@rk-desktop:~/Desktop/test$ ls
xyz.txt
rk10@rk-desktop:~/Desktop/test$


3. ls command : It is used to display the files and sub directories in the current working directory.

SYNTAX : ls

rk10@rk-desktop:~/Desktop/security$ ls
black_listed_IP firestarter-events.txt my_id
dns1.txt netstat_1.txt
rk10@rk-desktop:~/Desktop/security$


4. rm command : It is used to delete the file,but note that the files will be deleted permanently.

SYNTAX : rm filename

rk10@rk-desktop:~/Desktop/test$ ls
abc.txt
rk10@rk-desktop:~/Desktop/test$ rm abc.txt
rk10@rk-desktop:~/Desktop/test$ ls
rk10@rk-desktop:~/Desktop/test$
 
ADMINISTRATOR
Učlanjen(a)
10.05.1971
Poruka
54.331
Learning Bash-Shell Commands-Tutorial-3

1. mv command : It is used for file from one directories to another.You have to first enter the file_name(that you want to move) and then
the new location of that file.


SYNTAX : mv filename new_location
rk10@rk-desktop:~/Desktop/log$ ls
passwd.txt
rk10@rk-desktop:~/Desktop/log$ cd ../
rk10@rk-desktop:~/Desktop$ cd test
rk10@rk-desktop:~/Desktop/test$ ls
login.txt xyz.txt
rk10@rk-desktop:~/Desktop/test$ mv login.txt /home/rk10/Desktop/log
rk10@rk-desktop:~/Desktop/test$ cd ../log
rk10@rk-desktop:~/Desktop/log$ ls
login.txt passwd.txt
rk10@rk-desktop:~/Desktop/log$


2. mkdir commmand : It is used for creating new directories.You have to just specify the name of the directory after mkdir,it will create a directory in the current working directory.


SYNTAX : mkdir : mkdir new_directory
rk10@rk-desktop:~/Desktop/log$ ls
login.txt passwd.txt
rk10@rk-desktop:~/Desktop/log$ mkdir eagle
rk10@rk-desktop:~/Desktop/log$ ls
eagle login.txt passwd.txt
rk10@rk-desktop:~/Desktop/log$


3. less command : Its works as a text reader because it can display text files contents.


SYNTAX : less file_name.txt
rk10@rk-desktop:~/Desktop/log$ less login.txt //press CTRL+Z to come back to command promopt.
this is the content of the file login.txt….
[1]+ Stopped less login.txt
rk10@rk-desktop:~/Desktop/log$


4. stat command : It is very usefull in veiwing file statistics,e.g creation date,modification date etc.stat command gives the complete status of the file.


SYNTAX : stat file_name
rk10@rk-desktop:~/Desktop/log$ stat login.txt
File: `login.txt’
Size: 37 Blocks: 8 IO Block: 4096 regular file
Device: 808h/2056d Inode: 1024062 Links: 1
Access: (0644/-rw-r–r–) Uid: ( 1000/rk10) Gid: ( 1000/rk10)
Access: 2010-03-14 19:31:46.000000000 +0530
Modify: 2010-03-14 19:31:25.000000000 +0530
Change: 2010-03-14 19:31:25.000000000 +0530
rk10@rk-desktop:~/Desktop/log$
 
ADMINISTRATOR
Učlanjen(a)
10.05.1971
Poruka
54.331
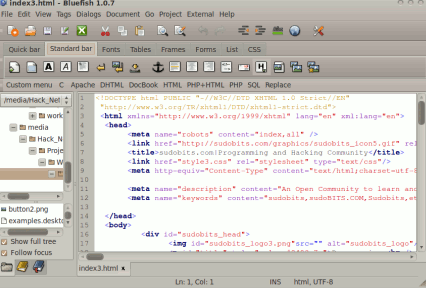
How to install Bluefish Editor on Ubuntu 10.04-10.10

Ubuntu 10.04 has a default text editor Gedit which is probably sufficient for editing source files in any programming language.For HTML also you can use gedit but for experienced web designers who have to implement a lot of features(Tables,frames,dialogs…) in websites or in database driven websites implemented using PHP-MySQL another efficient editor is required.That’s why Bluefish editor is designed.


bluefish_editor_for_ubuntu_10_04.png


Bluefish – HTML Editor for Ubuntu 10.04-10.10

Bluefish Editor is a HTML editor designed by using GTK+ for Web designers.It is FREE and Open Source Application with easy to use and powerful interface.It’s features include simple way to insert tables and frames in web pages,thumbnail creation with automatic linking as well as HTML syntax highlighting.
Installing Bluefish Editor in Ubuntu 10.10/10.04/9.10


1. Open Ubuntu Software Center and Search for “bluefish editor”.
2. Then Click on install button to start installation.
3. Wait for the installation to complete(It will take few minutes).
4. That’s All..Now you can start bluefish from Applications->Programming->Bluefish Editor.


Conclusion : Bluefish has a lot of features(You will enjoy it if you have some experience in web designing) but if you want some more advanced features to control the HTML elements in visual environment then you may like to use Adobe Dreamweaver.
 
ADMINISTRATOR
Učlanjen(a)
10.05.1971
Poruka
54.331
Optimize Ubuntu 10.04-10.10 Performance

Optimize Ubuntu 10.04-10.10 for speed by using prelinking

Ubuntu 10.04 is one of the fastest operating system and it’s booting time is specially optimized to boot within few seconds.Suppose,you are using ubuntu 10.04 on your older computer then you might find that the ubuntu 10.04 doesn’t perform according to the expectation.In general it is recommended to increase the Primary Memory i.e RAM.On the other hand there is another option to optimize ubuntu ..by using prelinking.


What is Prelinking?


Prelinking is a process to speed up system by reducing the time,the application program needs to begin.It is done by using a free program prelink,developed by Jakub, for Linux.It is just equivalent to the prebinding process of MacOSX.Prelinking process decreases the time in dynamic linking process(by Modifying ELF shared libraries and executable files) and due to the fewer reallocations, it also reduces the run time memory consumptions,so it also helps you in working more efficiently with low amount of RAM.


How to install Prelink on Ubuntu 10.04-10.10


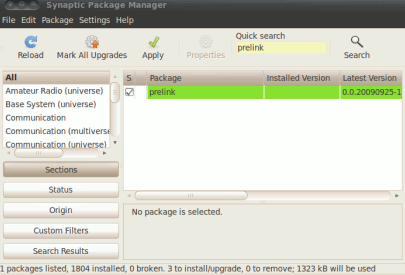
You can install prelink package from Synaptic Package Manager.Just follow few steps given below..


1.Open Synaptic Package Manager(Enter login password if it ask) from
System->Administration->Synaptic Package Manager,and search for “prelink“.


2.Mark for installation i.e check the box.


optimizie_ubuntu_10_04_performance.png


3.Click on Apply to begin the download and installation process.It will complete within a minute.
How to Enable Prelinking on Ubuntu 10.04-10.10

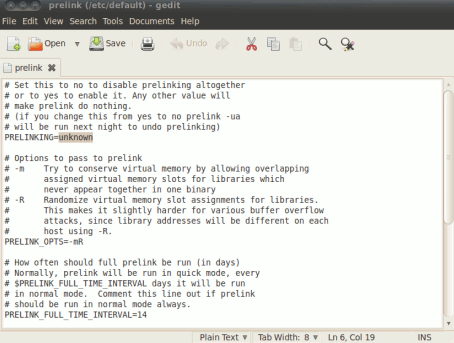
After installing prelink package you can enable it by using following command or If you want to do it in GUI mode then browse to System/etc/default/prelink using root power and edit the prelink file as described below…(If you don’t know how to browse in nautilus with root power then you can do it by installing ubuntu control center in ubuntu 10.04).


enable_prelink_in_ubuntu_10_04.png


$ gksu gedit /etc/default/prelink
Then enter your login password.Now,Search for prelinking and change its value from unknown to yes.
Initially the line was “prelinking=unknown“.
After changing it will be like “prelinking=yes“,then save it and exit.
Now prelinking is activated and prelinking process will begin in background in a periodic manner.


NOTE : If you feel some problem in running other application programs due to prelinking then remove it from executable files by typing this command-
$ sudo prelink -ua
Then use Synaptic Package Manager to remove the prelink package.
 
ADMINISTRATOR
Učlanjen(a)
10.05.1971
Poruka
54.331
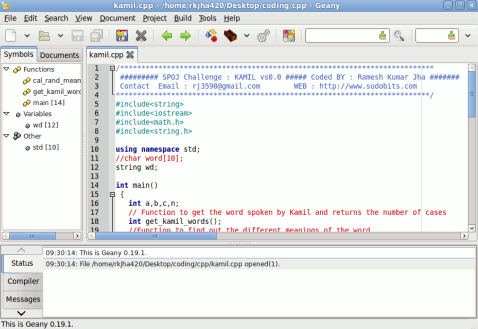
how to install geany on ubuntu

geany-snapshot.png


What is Geany ?


Geany is a text editor based on GTK2 toolkit with some extra features i.e the features of an integrated development environment(IDE).It is an open source and free application available for Linux(Ubuntu,Linux Mint,Debian,Fedora..) as well as for Windows and Mac.Geany is a light and fast IDE,with little dependencies.

  • Basic Features of Geany IDE
  • code folding
  • syntax highlighting
  • auto closing of *ML(XML,HTML,..) tags
  • code navigation
  • plugin interface
  • symbol lists
  • Build system to compile and execute your code
  • supported files are XML,HTML,C,java,PHP,C++,javascript..

Installing Geany in Ubuntu

You can install Geany in two ways either by command line or from synaptic package manager by adding a package source,because geany has not been added into default packages.


From Synaptic package Manager


Open the Synaptic Package Manager(Enter your Password,if required).Then click on Settings->Repositories.A new window with the Name Software Soruces will appear.Click on Other Software Tab.Next,click on +Add button to add software source,now it will ask for APT Line.Type

Kod:
ppa:ferramroberto/linuxfreedomlucid
in APT line and click on Add Source button.That’s all..Now update the package information by clicking on Reload button(in Synaptic Package Manager).Then search for ‘geany’ and mark the selected package for installation.Click on Apply to install.


Manual Installation of Geany on Ubuntu

Download The Package from the link given below.


Geany For 32 bit


Geany For 64 bit


Then open the file with Gdebi Installer and then click on ‘install package’ to begin the installation.Wait for the installation to complete.

After installing the Geany,you can find it in Applications->Programming->Geany.
 
ADMINISTRATOR
Učlanjen(a)
10.05.1971
Poruka
54.331
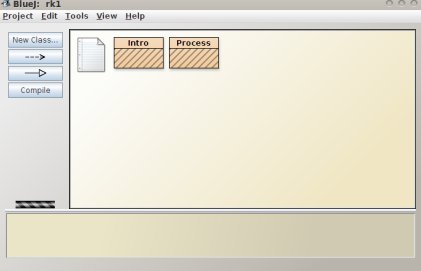
Install BlueJ(Interactive Java Environment) on Ubuntu

BlueJ – Interactive Java Environment for Ubuntu/Windows/Mac

BlueJ is an integrated java environment designed for beginners.BlueJ was developed as a part of university project(University of Kent,UK) and supported by Sun Microsystems.BlueJ focuses on visualization and interaction techniques to create good interactive environment for new students.Bluej is a cross-platform application(available for Linux,Windows,Mac,other) and available Free.


install_bluej_on_ubuntu.jpg


Important Features of BlueJ can be Summarized as

  • bulit in editor,debugger,compiler,jvm.
  • interactive testing
  • incremental application development
  • integrated environment
  • displays class structure using graphics
  • interactive object creation
install BlueJ on Ubuntu 10.04/9.10/10.10..

#1. Download Debian package(bluej-301.deb,size : 4.9MB) for Ubuntu,from the given link.

Download BlueJ


#2. Save the *.deb file to your disk and open it with Gdebi Installer by right clicking OR just by Double clicking.Then click on Install Package(a Small window will appear).


#3. Installation will complete within minute..waiting…You have installed the BlueJ successfully.


#4. To open it Go to Applications->Programming->BlueJ.
 
ADMINISTRATOR
Učlanjen(a)
10.05.1971
Poruka
54.331
how to speed up ubuntu 9.10-10.10

speed-up.jpg


Why do you need to speed up Ubuntu ?

Ubuntu 9.10 OR any other version of Linux is faster than windows based operating system e.g boot time,shutdown time and…so on, except in the case when we analyze about program start up time i.e the time it takes to launch an application.
The reason seems little obvious due to the structure and design of Linux based operating system like Ubuntu 9.10.In windows based applications,the most part of the required library(The libraries that must be available for the application to run,called as dependencies) are integrated within *.msi file i.e static linking is used.While in case of Linux based OS,dynamic linking is preferred and all the libraries are shared globally(Instead of windows analogy where all programs have their library attached statically) using the dynamic linking concept.That’s the secret for the small size of Linux based OS.So the application program has to first linked with all the libraries and API’s ..so it results in bigger startup time.The solution of this problem is prelinking.
How to speed up Ubuntu : with prelinking

To reduce program start up time …Prelinking is recommended.Go to this post for more details on how to use prelinking.(It’s applicable for All Linux Based system ..e.g Ubuntu 9.10,10.04,10.10..)
 
Natrag
Top