Linux Ubuntu 10.04 - 10.10

ADMINISTRATOR
Učlanjen(a)
10.05.1971
Poruka
54.331
how to change windows buttons layout in ubuntu 10.10

After installing Ubuntu 10.10 or it’s previous version 10.04 LTS, did you notice the windows button layout? It’s there in upper left corner(not in right,as expected) but most of the people who have any experience with windows based operating would like to have in upper right corner.Some users use windows and ubuntu in dual boot so if they are using both windows and ubuntu,then also they need to have windows buttons in right corner.So this post will explain you how to move the windows buttons to right in Ubuntu 10.10 Maverick Meerkat /10.04 Lucid Lynx.This can be easily done by editing the preferences in GNOME configuration Editor(gconf-editor).


How to Move Windows buttons to Right


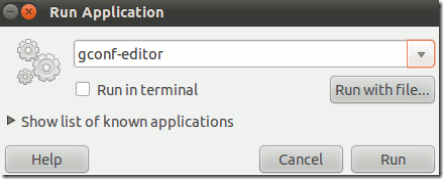
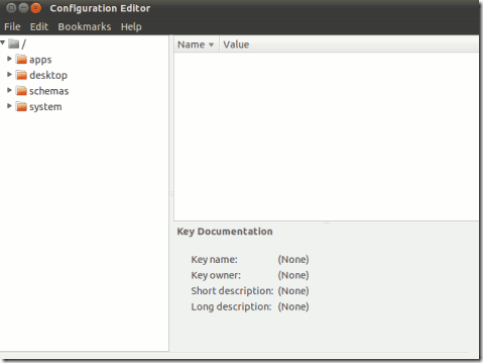
#1 : Hit ALT+F2 to open the Run Apps Dialog then enter ‘gconf-editor’ in text entry box and click on run button.


gconf-editor-ubuntu-1010.png


configuration-editor.png


#2 : Click on Apps –> Metacity –> General and select Button_Layout Field.


windows-button-settings.png


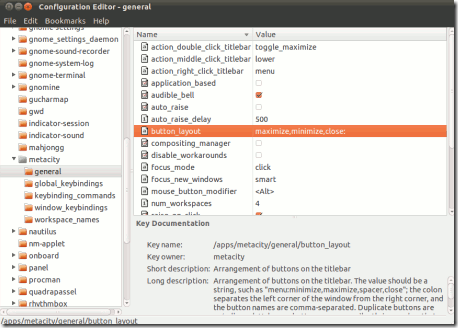
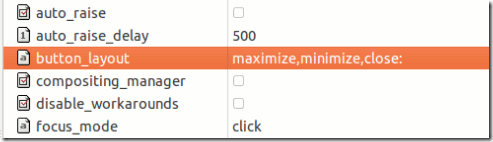
#3 : Then double click on value field to edit.The Default setting has the value
maximize,minimize,close:


button-layout.png


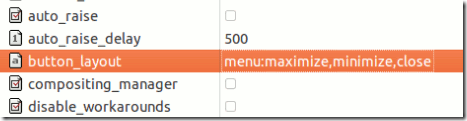
Then change it to something like this(and hit Enter to save)
menu:maximize,minimize,close
you can alter the arrangement of maximize,minimize or close according to your need.So after changing the value field it will look something like this,


button-right.png


The buttons position will change immediately,when you will hit enter.That’s all …I hope you got your windows buttons back in Right.
 
ADMINISTRATOR
Učlanjen(a)
10.05.1971
Poruka
54.331
how to install xfce on Ubuntu 10.10

This post will explain you how to install XFCE,a light weight Desktop Environment,on Ubuntu 10.10 Maverick Meerkat,by using Synaptic Package Manager and Commands.Ubuntu 10.10 has GNOME Desktop by Default which pretty good for most of the desktop users but if you are running an old computer with low graphics capability and RAM,then XFCE is the best choice.


Installing XFCE in Ubuntu 10.10


install-xfce-in-ubuntu-1010.png


The most simple way is to install xfce from synaptic package manager or ubuntu software center.Use quick search button and search for ‘xfce’ then install the latest build packages(check the box and click on Apply to install).For step by step tutorial see here how to install xfce .


Installing XFCE from Command Line/Terminal

open terminal(hit CTRL+ALT+T) and enter the following command(s)
sudo apt-get install gdm xfce4
After completing the installation steps,logout from the current session and select XFCE at login screen from drop down menu.If you want to use XFCE in future then change the default desktop from GNOME to XFCE.To do this first go to System -> Administration -> Login Screen and unlock it by entering your login password,and select XFCE as Default window manager.
 
ADMINISTRATOR
Učlanjen(a)
10.05.1971
Poruka
54.331
best multimedia player for ubuntu

best-multimedia-player-amarok.jpg


This post will give an overview of the best multimedia (audio,video..) player,that you can use on Ubuntu 10.10(Maverick Meerkat)/10.04(Lucid Lynx)/9.10..Actually the Ubuntu comes with a default media player which works well after installing some restricted audio and video codecs,but it doesn’t have that much sophisticated features expected by a music lover.That’s why I spent a lot of time in searching/installing/playing other media players and finally I came up with one player for each – one for audio(e.g for .mp3 files) and other for video file(e.g for .avi,mp4..).


Best Audio Player for Ubuntu : Amarok

Amarok is the best audio player for ubuntu or any other Linux based operating systems(it’s also available for windows and Mac OS).it’s open source and free with a lot of advanced features.The graphical interface is fantastic and simple to use.I know you will like it.To install Amarok just go to ubuntu software center and install in a click.Here is one screenshot, taken on Ubuntu 10.10.


amarok-snapshot-ubuntu.jpg

Best Video Player for Ubuntu : VLC

VLC is “all in one” media player and it’s available for all the platforms(Linux,windows,mac).For Ubuntu vlc is best for playing various video formats like avi,mp4,flv etc.See here for more details on vlc and how to install vlc on ubuntu 10.10 or installing vlc on ubuntu 10.04 .


vlc-best-video-player-ubuntu1.jpg


Other multimedia applications that you like to try on ubuntu includes XMMS media player and XBMC media player.If you have any experiences with any media players on Ubuntu,then please share with us through comments.
 
ADMINISTRATOR
Učlanjen(a)
10.05.1971
Poruka
54.331
how to install vlc media player in ubuntu 10.10

vlc-snapshot-ubuntu-1010.jpg


VLC Media Player is known as ‘all in one’ video player.It’s free and open source(VLC is available under GNU License) media player developed by VideoLAN Project.The most important point is that VLC player is an cross platform application written in C/C++.it’s available for windows,GNU/Linux ,Mac OSX,BeOS and BSD.On Ubuntu 10.10 you can also use default Media Player for playing common Video formats like *.AVI,audio formats like *.mp3 but VLC supports very wide range of input and output files formats.So after installing the Ubuntu 10.10 Maverick Meerkat,you will surely like to install VLC,and that’s why this post has been written i.e to explain and troubleshoot beginner Ubuntu users regarding VLC Media Player.You can install vlc either from software center or synaptic package manager in GUI mode.
Ways to Install VLC Player on Ubuntu 10.10

#1 : From Synaptic Package Manager

Go to System->Administration->Synaptic package Manager and search for ‘vlc’ in quick search bar.Then mark the packages – ‘vlc-plugin-pulse’ and ‘mozilla-plugin-vlc’ and click on Apply to install the selected packages.


#2 : From Command Line

open terminal(CTRL+ALT+T) and enter the command written below.
sudo apt-get install vlc vlc-plugin-pulse mozilla-plugin-vlc
 
ADMINISTRATOR
Učlanjen(a)
10.05.1971
Poruka
54.331
how to tweak Ubuntu 10.10 using Ubuntu Tweak

tweak-ubuntu-10104.png


This post will explain about a best application to tweak ubuntu 10.10(Maverick Meerkat) settings without any hassle.The application name is Ubuntu – Tweak ,it’s version 0.5.7 has arrived along with the arrival with Ubuntu 10.10.It’s designed to be very easy to use and intended to make the administration and application management easier.Ubuntu Tweak has good gui design and it’s available free as an open source software.


Important Features of Ubuntu Tweak – At a Glance

  • GNOME Session Control
  • Quick Install button for popular Applications
  • Nautilus Settings
  • system security settings
  • GNOME panel settings
  • Tweak Metacity Windows style
  • Power Management settings && …more.
How to install Ubuntu Tweak in Ubuntu 10.10

how-to-tweak-ubuntu-10-10.png


There are many ways to install Ubuntu Tweak e.g from command line,synaptic package manager or after downloading *.deb package manually from it’s official website.
Installing Ubuntu Tweak from Command Line

Open Terminal and Type the following command followed by your ubuntu login password.
sudo add-apt-repository ppa:tualatrix/ppa
sudo apt-get update
sudo apt-get install ubuntu-tweak
Download Ubuntu Tweak from it’s website

Other simple way to install ubuntu tweak is to download the ubuntu tweak 0.5.7 from it’s website.


Download Ubuntu Tweak 0.5.7


and open it with software center;then click on install button ….that’s all you are done! For stepwise tutorial see here – installing Ubuntu-Tweak
Now open Ubuntu Tweak from Applications –> System Tools –> Ubuntu Tweak and configure your ubuntu as you want …If you have any problem …then let us know through comments.
 
ADMINISTRATOR
Učlanjen(a)
10.05.1971
Poruka
54.331
how to tweak ubuntu 10.04-10.10-installing Ubuntu-Tweak

Ubuntu 10.04(Lucid Lynx) is very fast and easy to customize but desktop settings and system configuration is still not so easy for the new users who just migrated from windows based system.That’s why in this post you will learn about a software(tool) that you can use to customize Ubuntu 10.04 in much simple way.That application name is ubuntu tweak,a free and open source software.


Tweaking Ubuntu 10.04 by Using Ubuntu-Tweak


Ubuntu-Tweak is an application for configuring ubuntu in more easy way and useful for both novice and advanced users.It allows you to change the look and behavior of desktop as well as to administrate system configuration that is usually not available in the GNOME or KDE desktop.


ubuntu_tweak_for_tweaking_ubuntu.png


A quick look at some important features of Ubuntu-Tweak

  • view basic information of your computer(CPU,Memory,Kernel,Distro..)
  • GNOME Session Control
  • Manage Startup programs
  • control desktop and mounted volume icons i.e whether they will apear and not.
  • Change Nautilus settings
  • Panel settings of GNOME
  • Power Management Settings with Advanced options
  • Security settings of the computer
  • other applications settings like Compiz
How to install ubuntu-tweak on Ubuntu 10.04-10.10

Method-A(From GUI)
1. Download ubuntu-tweak_0.5.4.1-1_all.deb file from the official website(Link is given below) of ubuntu tweak.

download ubuntu tweak


2. Then click on Download Now and open the file with GDebi package installer or just save it on your computer.


installing_ubuntu_tweak.png


3. After the completion of downloading,installation process will begin automatically(If you have selected 2nd option in the above step then right click on the file and open with Gdebi package installer).A new window will appear click on install package to begin installation.


install_ubuntu_tweak.png


4.Installation will finish within a minute.
5. That’s all..Now you are ready to tweak your ubuntu computer.


Method-B(From Command Line Interface)

1. Open ubuntu terminal or shell from Applications->Accessories->Terminal or Hit CTRL+ALT+T.
2. Run the Following Command(Enter you login password if required)
sudo add-apt-repository ppa:tualatrix/ppa
sudo apt-get update
sudo apt-get install ubuntu-tweak
3. That’s All..you have installed ubuntu-tweak successfully.


Using Ubuntu-Tweak

Click on Applications->System Tools->Ubuntu Tweak to start the application(ubuntu tweak).Now select the options from right sidebar and customize you system and desktop settings it in few mouse clicks.


tweaking_ubuntu_settings.png
 
ADMINISTRATOR
Učlanjen(a)
10.05.1971
Poruka
54.331
how to install google gadgets in ubuntu 10.10

google-gadgets-ubuntu-1010-snapshot.jpg


Ubuntu 10.10 Maverick is out! and if you want a charming and fancy GNOME desktop then Google gadgets will surely help you.Before going to our point first I am going to introduce you with Google Gadgets.In simple words Google Gadgets are mini objects developed in collaborative manner,and can be used to provide dynamic content to any web pages or to your desktop. It’s free to use and available for all platforms.


Installing Google gadgets on Ubuntu 10.10 Desktop

To install Google Desktop Gadgets in Ubuntu 10.10 just search for ‘gadgets’ or ‘google gadgets’ in Ubuntu Software Center and select the package you want to install.By default you should choose GTK based unless you want to use Google gadgets on KDE desktop.Then click on the install button and wait for the installation to complete.It will hardly take a minute to complete.


Where to find more cool Desktop Gadgets ?

Download more cool gadgets from it’s official website.
 
ADMINISTRATOR
Učlanjen(a)
10.05.1971
Poruka
54.331
Ubuntu 10.10 Desktop Look

ubuntu-1010-desktop.jpg


Ubuntu 10.10 final was released on October 10,2010.Here is the look of Ubuntu 10.10 Desktop(Ubuntu uses GNOME as Window Manager).
The Extra Applications used here are Docky,Compiz ; the wallpapers/background/Themes used in this screenshot was installed by default.
 
ADMINISTRATOR
Učlanjen(a)
10.05.1971
Poruka
54.331
Ubuntu 10.10 Desktop Wallpapers

In the new version of Ubuntu i.e Ubuntu 10.10 Maverick Meerkat(released few weeks ago),some new and charming wallpapers has been added by default.If you haven’t installed Ubuntu 10.10 yet,then here is some natural wallpaper snapshots and download link for you;that I like.


Wallpaper 1 : Feather


ubuntu-1010-wallpaper1.jpg


Wallpaper 2 : Comet


ubuntu-1010-wallpaper2.jpg


Wallpaper 3 : Crocosmia


ubuntu-1010-wallpaper3.jpg


Download above three wallpapers for your Desktop.
 
ADMINISTRATOR
Učlanjen(a)
10.05.1971
Poruka
54.331
how to install adobe flash player in Ubuntu 10.10

Ubuntu 10.10 Maverick Meerkat has just Released and after the completion of download and installation procedure of Ubuntu 10.10 you must install adobe flash player because most of the web pages on the World Wide Web(www) contains flash content.That’s why A flash player is required and adobe flash player is the ultimate choice.In Ubuntu 10.10 many things has changed as compare to it’s predecessor version Ubuntu 10.04 – Lucid Lynx,e.g you will notice some changes in ubuntu software center,in beginning itself the installation options and interface has changed.


adobe_flash_player21.png


You can Install Adobe Flash Player in many ways -


1. By Directly Downloading it from it’s official website

Go here and download Adobe Flash Player,then open the file with debian package installer.Then the installation will complete within few minutes.If you are still not sure then go here “Steps in Installing Adobe Flash player” for stepwise details.


2. From Ubuntu Software Center OR Synaptic Package Manager
Open USC or SPM and search for ‘adobe flash player’; click on install(In case of USC) or mark the package and Apply(In case on SPM) to install the adobe flash player packages.You may have to authenticate before installing,if so then enter your ubuntu 10.10 login password to proceed.
 
Natrag
Top