With everything configured we select the download to folder because TTActivator still cannot see the nav4 devices.
TTActivator will tell us the size of the map and if it does not have the meta code it warns us that there is no code, if we have it we can apply it to the meta.txt that is in the TTActivator folder so that it can activate our map. We will have to put that meta.txt inside the gps as indicated in the previous manual. TTActivator takes care of the download of all the parts that the map has in this case 9. We will download all the parts to the
Upload folder
Other configuration images for download:
Download the truck map, remember that just by installing the truck map you already have the truck map options, you do not need to change the patch or navcore.
For other maps consult the list of known maps above, you can download maps with or without buildings, etc ...
Europe_HM_TRUCK, map truck, dangerous goods.
With all the parts downloaded, we proceed to the installation, as we have commented, there are two options, we go with the first:
Install the maps in the internal memory.
It is recommended to do the installations on the microsd card to avoid problems with the official tomtom MDC program. Installing on the card you can remove it if you are going to connect your device with the Mydrive connect (MDC) program.
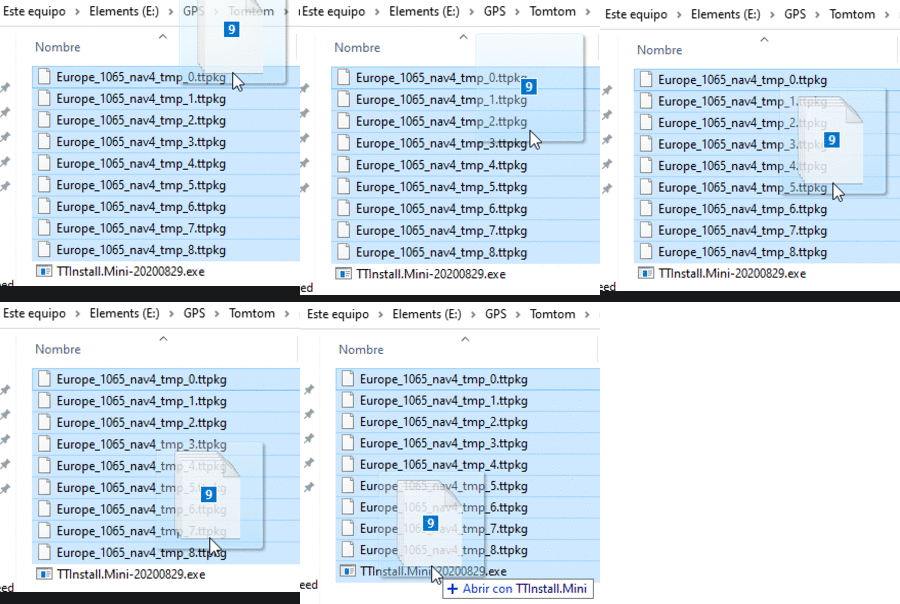
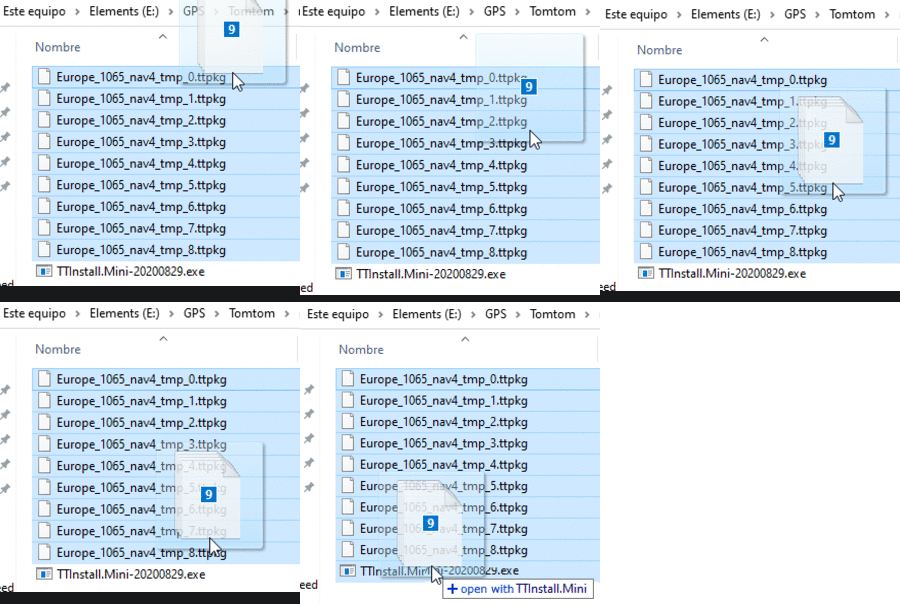
We download all the parts to the Upload folder and with the GPS on and connected to the pc we select all the parts and drag them to the file "TTInstall.Mini-20200829.exe" as shown in the image...
If dragging doesn't work, create a .bat file with the name of all parts of the map, put the bat in the Upload folder. Do it like this:
- Create a text file, you can name it as the map you are going to install, for example install_Europe or install_Europe_TRUCK, etc...
- Write in the first thing
Code:
TTInstall.Mini-20200829.exe
- Then write the names of each part as you have them downloaded, it will be more unless so with the example of Europe.
Code:
TTInstall.Mini-20200829.exe Europe_1065_nav4_tmp_0.ttpkg Europe_1065_nav4_tmp_1.ttpkg Europe_1065_nav4_tmp_2.ttpkg Europe_1065_nav4_tmp_3.ttpkg Europe_1065_nav4_tmp_4.ttpkg Europe_1065_nav4_tmp_5.ttpkg Europe_1065_nav4_tmp_6.ttpkg Europe_1065_nav4_tmp_7.ttpkg Europe_1065_nav4_tmp_8.ttpkg
- Remember that TTActivator renames the downloads as temporary files (tmp) putting the map type (nav4, in this case) and the selected series (1065, in this example).
- With the text file already written, we close by selecting the save as option and change the extension "txt" to "bat"
- We will have the "file.bat" together with all the parts of the map and the file "TTInstall.Mini-20200829.exe" in the same folder.
- We double click on the "file.bat" and the installation of the map will begin.
Install the maps on the micro sd card that we insert into the gps.
After having inserted the card in the GPS, it will ask us to format it, if we are sure that it is the correct card we proceed to format it for map use, the gps nav4 asks if the microSD is for routes or maps.
Next we need to create a bat file to install the parts of the map, continuing with the example of the map of Europe, we create a text file and put this content in it:
Code:
TTInstall.Mini-20200829.exe -sd Europe_1065_nav4_tmp_0.ttpkg Europe_1065_nav4_tmp_1.ttpkg Europe_1065_nav4_tmp_2.ttpkg Europe_1065_nav4_tmp_3.ttpkg Europe_1065_nav4_tmp_4.ttpkg Europe_1065_nav4_tmp_5.ttpkg Europe_1065_nav4_tmp_6.ttpkg Europe_1065_nav4_tmp_7.ttpkg Europe_1065_nav4_tmp_8.ttpkg
As you can see, it is the same as before but with the -sd switch, which will tell the program to install it on the microsd card.
We save the text file changing the extension "txt" to "bat". You can name your file "install_ttpkg_sd" or as we have mentioned before with the name of the map to be installed, for example "install_Europe" or "install_Europe_TRUCK", etc...
The ".bat" file must be in the same folder as the "TTInstall.Mini-20200829.exe" file and all parts of the map.
It is important that you make sure that the map has a known meta code and that you have downloaded all of its parts.
We execute the file by double clicking on it.
Note: In the example we have written:
Europe_1065_nav4_tmp_0.ttpkg Europe_1065_nav4_tmp_1.ttpkg Europe_1065_nav4_tmp_2.ttpkg Europe_1065_nav4_tmp_3.ttpkg Europe_1065_nav4_tmp_4.ttpkg Europe_1065_nav4_tmp_5.ttpkg Europe_1065_nav4_tmp_6.ttpkg Europe_1065_nav4_tmp_7.ttpkg Europe_1065_nav4_tmp_8.ttpkg
If you are going to download another map, those names will be different, but the beginning of the text in the file will remain, for example for Iberia the file would be:
Code:
TTInstall.Mini-20200829.exe -sd Iberia_1065_nav4_tmp_0.ttpkg
Because Iberia only has one part.
You can save the bat files for future installations, if the map you download has the same parts, otherwise you will have to add the missing part, for example with Europe 1060 the file was:
Code:
TTInstall.Mini-20200829 .exe -sd Europe_1065_nav4_tmp_0.ttpkg Europe_1065_nav4_tmp_1.ttpkg Europe_1065_nav4_tmp_2.ttpkg Europe_1065_nav4_tmp_3.ttpkg Europe_1065_nav4_tmp_4.ttpkg Europe_1065_nav4_tmp_5.ttpkg Europe_1065_nav4_tmp_6.ttpkg Europe_1065_nav4_tmp_7.ttpkg
But for Europe 1065 there is one more part (Europe_8.ttpkg):
Code:
TTInstall.Mini-20200829.exe -sd Europe_1065_nav4_tmp_0.ttpkg Europe_1065_nav4_tmp_1.ttpkg Europe_1065_nav4_tmp_2.ttpkg Europe_1065_nav4_tmp_3.ttpkg Europe_1065_nav4_tmp_4.ttpkg Europe_1065_nav4_tmp_5.ttpkg Europe_1065_nav4_tmp_6.ttpkg Europe_1065_nav4_tmp_7.ttpkg Europe_1065_nav4_tmp_8.ttpkg
Note: The bat installation files that you create can be used for future installations of the same map, if the parts to install are the same.
Installation of radars:
As with maps, there are two possibilities:
- Install the speedcam in the internal memory.
- Install the speedcam on the micro sd card that we insert into the gps.
My advice is that we do the installation on the microSD card.
In the Upload folder that we have downloaded we have:
First we must download the radars in ttpkg format, for this we execute the download_speedcam.exe program that will create a folder called "speed_cam_ttpkg".
From the downloaded files we take the ones that interest us and place them in the Upload folder along with the ones we see in the previous image.
With the gps connected to the pc, the map installed on the card, we double click on the "Install_Safety_Cam_SD_menu.bat" file. It will give us to choose two options, if we are going to install a few radars we select option 2 that will make the installation of the radars take place in the microSD that we have located in the "upload" folder. If we are going to install all the radars we select option 1, option 2 will also install all of them, if we have them located in the "upload" folder, but it is a slower option.
If you select option 1 and you don't have the 47 radar files in the "upload" folder, the installation will give you an error.
For the example I am going to install only 3 safety cam.
That is the manual way to install maps and radars, I have prepared this tool that does it automatically:
Download Install_All_ttpkg_nav4
How does it work?
- Download and unzip.
- Put the tool in the "Upload" folder.
- Put all the ttpkg packages that you want to upload to the card, maps and radars, it doesn't matter if they are together.
- Your gps must have a microSD card inserted and formatted for maps.
- Perform a reset to your gps, until you hear the drums.
- Connect the gps to the pc, the MDC program must be turned off even from the taskbar.
- Run the "Install_All_ttpkg_nav4" exe.
- When the installation is finished, reset your device again.


