How to Repair Bad Sectors

ADMINISTRATOR
Učlanjen(a)
11.10.2009
Poruka
66.917
Bad sectors are sections of your computer's hard drive that have been damaged, and have lost the ability to save and store your data.[1] If your computer makes grinding noises when using the hard drive, that's a good sign that your hard drive has bad sectors. When you repair a bad sector, your computer will replace the bad sectors with good sectors and ignore the bad sectors. The methods for repairing bad sectors are different, depending on what version of Windows you're using.


Steps
The larger your hard drive, the more sectors there are to check, and the longer this process will take. Start this process when you won't need your computer for a while, such as overnight.


aid1707506-728px-Repair-Bad-Sectors-Step-1.jpg.webp

1
Close all of your open programs and files. Windows XP can't scan or fix a bad sector if that sector is being used by an open program or file.[2]
  • Windows XP uses a system utility called Chkdsk to scan for and fix bad sectors.


  • aid1707506-728px-Repair-Bad-Sectors-Step-2.jpg.webp

    2
    Open My Computer. Double-click My Computer to open it.
  • aid1707506-728px-Repair-Bad-Sectors-Step-3.jpg.webp

    3
    Choose a hard drive to check for bad sectors. In the Explorer window, in the sidebar, right-click the hard drive you'd like to check for bad sectors, and then click Properties.
    • The C: drive is often the hard drive.
  • aid1707506-728px-Repair-Bad-Sectors-Step-4-Version-2.jpg.webp

    4
    In the Properties window, click the Tools tab.
  • aid1707506-728px-Repair-Bad-Sectors-Step-5-Version-2.jpg.webp

    5
    In the Error-checking section, click Check Now.
  • aid1707506-728px-Repair-Bad-Sectors-Step-6-Version-2.jpg.webp

    6
    Choose the Check Disk options you'd like to use. In the Check Disk dialog box, you can have Check Disk fix file system errors it finds and recover bad sectors.
    • If you'd only like to scan for and fix bad hard drive sectors, make sure thatAutomatically fix file system errors is unchecked.
  • aid1707506-728px-Repair-Bad-Sectors-Step-7-Version-2.jpg.webp

    7
    Click Start. Windows will start checking your hard drive for bad sectors and will fix any that it finds.
    • If you have any open files or programs at this point, you'll get an error message asking if you'd like to schedule the disk check when you restart your computer. If you clickYes, it will restart your computer and perform the disk check.
  • aid1707506-728px-Repair-Bad-Sectors-Step-8.jpg.webp

    8
    Review the Chkdsk report. When it's done, Chkdsk will create a brief report.
    • Chkdsk code 0 means no errors were found and code 1 means that errors were found and fixed.
    • If the check disk process failed to fix the bad sectors, your hard drive may be failing and you may want to backup your drive to a new one. [Click here] for help on backing up your hard drive.
 
ADMINISTRATOR
Učlanjen(a)
11.10.2009
Poruka
66.917
Windows 7
  1. Repair-Bad-Sectors-Step-9.jpg

    1
    Close all of your open programs and files. Windows 7 can't scan or fix a bad sector if that sector is being used by an open program or file.[3]

  2. aid1707506-728px-Repair-Bad-Sectors-Step-10.jpg.webp

    2
    Open Computer. Click Start, and then click Computer.

  3. aid1707506-728px-Repair-Bad-Sectors-Step-11.jpg.webp

    3
    Choose a hard drive to check for bad sectors. Right-click the hard drive you want to scan, and then click Properties.

  4. aid1707506-728px-Repair-Bad-Sectors-Step-12.jpg.webp

    4
    In the Properties window, click the Tools tab.

  5. aid1707506-728px-Repair-Bad-Sectors-Step-13.jpg.webp

    5
    In the Error-checking section, click Check now.

  6. aid1707506-728px-Repair-Bad-Sectors-Step-14.jpg.webp

    6
    Check the Scan for and attempt recovery of bad sectors.
    • You can also check the Automatically fix file system errors to check the hard drive for software-based errors.
    • Place a check mark within the box next to "Scan for and attempt recovery of bad sectors."

  7. aid1707506-728px-Repair-Bad-Sectors-Step-15.jpg.webp

    7
    Click Start. Windows will start checking your hard drive for bad sectors and will fix any that it finds.

  8. aid1707506-728px-Repair-Bad-Sectors-Step-16.jpg.webp

    8
    Don't use your computer while Windows attempts to fix errors.
    • If you have any open files or programs at this point, you'll get an error message asking if you'd like to schedule the disk check when you restart your computer. If you clickYes, it will restart your computer and perform the disk check.

  9. aid1707506-728px-Repair-Bad-Sectors-Step-17.jpg.webp

    9
    Review the check disk report. Click the See details down arrow to see more details about your report.
    • If the check disk process failed to fix the bad sectors, your hard drive may be failing and you may want to backup your drive to a new one. [Click here] for help on backing up your hard drive.
 
ADMINISTRATOR
Učlanjen(a)
11.10.2009
Poruka
66.917
Windows 8/10
  1. aid1707506-728px-Repair-Bad-Sectors-Step-18.jpg.webp

    1
    Move the mouse cursor to the upper-right corner of the screen, move the mouse pointer, and then click Search.[4]
    • If you're using the touch interface, swipe in from the right edge of the screen, and then touch Search.
    • For these steps to work, you will probably need an admin account and password.

  2. aid1707506-728px-Repair-Bad-Sectors-Step-19.jpg.webp

    2
    In the Search field, type This PC, and then click or touch This PC.

  3. aid1707506-728px-Repair-Bad-Sectors-Step-20.jpg.webp

    3
    Right-click the drive you want to repair, and then click Properties.
    • If you're using touch, press and hold the drive you want to repair, and then touchProperties.

  4. aid1707506-728px-Repair-Bad-Sectors-Step-21.jpg.webp

    4
    Select the Tools tab.

  5. aid1707506-728px-Repair-Bad-Sectors-Step-22.jpg.webp

    5
    Under Error checking, click or touch Check.
    • You may be asked for an admin password. Enter your admin password. If you don't have one, contact the person who has the admin account.

  6. aid1707506-728px-Repair-Bad-Sectors-Step-23.jpg.webp

    6
    Review the scan results. The error checking scan will tell you either that there are errors or there aren't errors. You can still repair the drive, even if there are no errors, but you don't need to.[5]

  7. aid1707506-728px-Repair-Bad-Sectors-Step-24.jpg.webp

    7
    Click Scan and repair drive.

  8. aid1707506-728px-Repair-Bad-Sectors-Step-25.jpg.webp

    8
    Choose when to repair the file system. In the Restart your computer to repair file system errors dialog box, click Schedule on next restart to repair your hard drive the next time you start the computer. Click Restart to repair the hard drive now.

  9. aid1707506-728px-Repair-Bad-Sectors-Step-26.jpg.webp

    9
    Wait for Windows to scan and repair the hard drive sectors. Do not try to use your computer or interrupt the sector scan while it's happening.
 
ADMINISTRATOR
Učlanjen(a)
11.10.2009
Poruka
66.917
The How-To Geek Guide to Using Check Disk in Windows 7, 8, or 10
image76.png


Anytime somebody has hard drive errors, I always recommend that they run chkdsk—what geek wouldn’t? Here’s a full guide to using the Check Disk feature built into every version of Windows.

The chkdsk or “Check Disk” utility is used in Windows to scan through your entire hard drive and find problems… it’s like a lot like doing inventory… it’s boring, but it has to be done sometimes. I recommend that you run through a check disk every month or two.

This works the same in Windows Vista, Windows 7, Windows 8, or Windows 10, so while the screens may look slightly different in each version, they are all in the same place.

Image by Nemo


Using CheckDisk the GUI Way
Open up Computer and then right-click on the drive you want to check, and choose Properties, or just click the drive, and then click the Properties button.

558x368ximage77.png.pagespeed.gp+jp+jw+pj+js+rj+rp+rw+ri+cp+md.ic.dWyeXIPTgc.png


Then select the Tools tab, and click the “Check Now” button.

532x235ximage78.png.pagespeed.gp+jp+jw+pj+js+rj+rp+rw+ri+cp+md.ic.pTkjvODqd0.png


A little dialog will pop up to allow you to choose the options you want for the disk check. You should check both options if you want to really check the disk properly, but if you just want to do a quick check you could select only the first one.

370x303ximage79.png.pagespeed.gp+jp+jw+pj+js+rj+rp+rw+ri+cp+md.ic.tZeWo-epWe.png


The only problem with that is that Windows can’t check a drive that’s being used, such as the system drive, but Windows will let you schedule a disk check for the next reboot.

486x229ximage80.png.pagespeed.gp+jp+jw+pj+js+rj+rp+rw+ri+cp+md.ic.57MtjyBmh8.png


You should keep in mind that running through a full check disk takes quite a while, sometimes hours depending on how big the drive is and how many files you have.

Cancelling the Scheduled Disk Check
If you had scheduled a disk check but decided you would like to cancel it, you can run a command to stop it.

Open up an administrator mode command prompt by searching in the Start menu or screen for “cmd” and then right-clicking on the item and choosing “Run as Administrator”. Type in the following command, substituting the drive letter if necessary.

chkntfs /x c:

516x168ximage95.png.pagespeed.gp+jp+jw+pj+js+rj+rp+rw+ri+cp+md.ic.DMXSvPZRmy.png


Seems like they could have a better command line output… something like “canceled!” would have even worked… oh well.

How to Tell if a Manual Disk Check is Scheduled
Open an admin mode command prompt, and then type in the following command:

chkntfs c:

527x165ximage96.png.pagespeed.gp+jp+jw+pj+js+rj+rp+rw+ri+cp+md.ic.zzxWqDtbQE.png


How to Tell if an Automatic Disk Check is Scheduled
Sometimes if your computer has not shut down correctly, Windows will mark the drive as “dirty” basically as a reminder to itself that the drive probably has filesystem errors and should be checked. When the flag is set, you’ll be told the disk requires checking during the next bootup.

You can easily see the state of this flag by using two different command line options. The first is the same command as above, but you can see the output is different if the drive is set to be automatically checked.

chkntfs c:

586x164ximage97.png.pagespeed.gp+jp+jw+pj+js+rj+rp+rw+ri+cp+md.ic.p7R_kf7tCN.png


You could also use this command to just query the dirty bit:

fsutil dirty query c:

image81.png


Using CheckDisk from the Command Line
Open up an administrator mode command prompt, and then type in the following command to do an exhaustive check of your drive. Substitute C: for whatever drive you want to check.

chkdsk /f /r C:

If the drive is a system drive or has files in use, you’ll be asked to schedule the check for the next reboot:

578x237ximage98.png.pagespeed.gp+jp+jw+pj+js+rj+rp+rw+ri+cp+md.ic.7b1yf-Kku5.png


The above command is the recommended way to perform a disk check, but if you want to do a less exhaustive check, you could remove the /R option from the command.

Here’s the full list of parameters for your geeky enjoyment:

C:\>chkdsk /?
Checks a disk and displays a status report.

CHKDSK [volume[[path]filename]]] [/F] [/V] [/R] [/X] [/I] [/C] [/L[:size]] [/B]

volume Specifies the drive letter (followed by a colon),
mount point, or volume name.
filename FAT/FAT32 only: Specifies the files to check for fragmentation.
/F Fixes errors on the disk.
/V On FAT/FAT32: Displays the full path and name of every file
on the disk.
On NTFS: Displays cleanup messages if any.
/R Locates bad sectors and recovers readable information
(implies /F).
/L:size NTFS only: Changes the log file size to the specified number
of kilobytes. If size is not specified, displays current
size.
/X Forces the volume to dismount first if necessary.
All opened handles to the volume would then be invalid
(implies /F).
/I NTFS only: Performs a less vigorous check of index entries.
/C NTFS only: Skips checking of cycles within the folder
structure.
/B NTFS only: Re-evaluates bad clusters on the volume
(implies /R)

The /I or /C switch reduces the amount of time required to run Chkdsk by
skipping certain checks of the volume.
Note: You’ll probably notice that this guide was originally written a few years ago. We’ve updated it for Windows 7, Windows 8, and Windows 10 and are republishing it for all the readers that might have missed it the first time.

You can also use chkdsk on Windows XP as well, but some of the options are slightly different. In general, it works the same way.
 
ADMINISTRATOR
Učlanjen(a)
11.10.2009
Poruka
66.917
Bad Sectors Explained: Why Hard Drives Get Bad Sectors and What You Can Do About It
650x300xhard-drive-head.jpg.pagespeed.gp+jp+jw+pj+js+rj+rp+rw+ri+cp+md.ic.bv1-Eorp6b.jpg


A bad sector on a hard drive is simply a tiny cluster of storage space — a sector — of the hard drive that appears to be defective. The sector won’t respond to read or write requests.

Bad sectors can occur on both traditional magnetic hard drives and modern solid-state drives. There are two types of bad sectors — one resulting from physical damage that can’t be repaired, and one resulting from software errors that can be fixed.


Types of Bad Sectors
There are two types of bad sectors — often divided into “physical” and “logical” bad sectors or “hard” and “soft” bad sectors.

A physical — or hard — bad sector is a cluster of storage on the hard drive that’s physically damaged. The hard drive’s head may have touched that part of the hard drive and damaged it, some dust may have settled on that sector and ruined it, a solid-state drive’s flash memory cell may have worn out, or the hard drive may have had other defects or wear issues that caused the sector to become physically damaged. This type of sector cannot be repaired.

A logical — or soft — bad sector is a cluster of storage on the hard drive that appears to not be working properly. The operating system may have tried to read data on the hard drive from this sector and found that the error-correcting code (ECC) didn’t match the contents of the sector, which suggests that something is wrong. These may be marked as bad sectors, but can be repaired by overwriting the drive with zeros — or, in the old days, performing a low-level format. Windows’ Disk Check tool can also repair such bad sectors.

Causes of Hard Bad Sectors
Your hard drive may have shipped from the factory with bad sectors. Modern manufacturing techniques aren’t perfect, and there’s a margin or error in everything. That’s why solid-state drives often ship with some defective blocks. These are marked as defective and are remapped to some of the solid-state drive’s extra memory cells.

On a solid-state drive, natural wear will eventually result in sectors becoming bad as they’re written to many times, and they’ll be remapped to the solid-state drive’s extra — or “overprovisioned” — memory. When the solid-state drive’s extra memory runs out, the drive’s capacity will start to drop as sectors become unreadable.

On a traditional magnetic hard drive, bad sectors can be caused by physical damage. The hard drive may have had a manufacturing error, natural wear may have worn part of the hard drive down, the drive may have been dropped, causing the hard drive’s head to touch the platter and damage some of the sectors, some air may have entered the sealed area of the hard drive and the dust may have damaged the drive — there are many possible causes.

650x488xhard-drive-head-damage.jpg.pagespeed.gp+jp+jw+pj+js+rj+rp+rw+ri+cp+md.ic.3SSImn7tOW.jpg


Causes of Soft Bad Sectors
Soft bad sectors are caused by software issues. For example, if your computer suddenly shuts off due to a power outage or a pulled power cable, it’s possible that the hard drive may have shut off in the middle of writing to a sector. In some cases, it’s possible for sectors on the hard drive to contain data that doesn’t match their error-correction code — this would be marked as a bad sector. Viruses and other malware that messes with your computer could also cause such system issues and cause soft bad sectors to develop.

Data Loss and Hard Drive Failure
The reality of bad sectors brings home a chilling fact — even if your hard drive is otherwise working properly, it’s possible for a bad sector to develop and corrupt some of your data. This is another reason why you should always back up your data — multiple copies are the only thing that will prevent bad sectors and other issues from ruining your hard drive’s data.


xdead-hard-drive.jpg.pagespeed.gp+jp+jw+pj+js+rj+rp+rw+ri+cp+md.ic.CDm1QoO54t.jpg

How to See if Your Hard Drive is Dying with S.M.A.R.T.
Hard drives use S.M.A.R.T. (Self-Monitoring, Analysis, and Reporting Technology) to gauge their own reliability and determine if they’re failing. You...[Read Article]
When your computer notices a bad sector, it marks that sector as bad and ignores it in the future. The sector will be reallocated, so reads and writes to that sector will go elsewhere. This will show up as “Reallocated Sectors” inhard drive S.M.A.R.T. analysis tools like CrystalDiskInfo. If you had important data in that sector, however, it may be lost — possibly corrupting one or more files.

A few bad sectors don’t indicate that a hard drive is about to fail — they can just happen. However, if your hard drive is rapidly developing bad sectors, it may be a sign that your hard drive is failing.

How to Check for and Repair Bad Sectors

The How-To Geek Guide to Using Check Disk in Windows 7, 8, or 10
Anytime somebody has hard drive errors, I always recommend that they run chkdsk—what geek wouldn’t? Here’s a full guide to using the Check Disk feature built into every version of Windows.
Windows has a built-in Disk Check tool — also known as chkdsk — that can scan your hard drives for bad sectors, marking hard ones as bad and repairing soft ones to make them usable again. If Windows thinks that there’s a problem on your hard disk — because the hard drive’s “dirty bit” is set — it will automatically run this tool when your computer starts up. But you’re also free to run this tool manually at any point.

Other operating systems, including Linux and OS X, also have their own built-in disk utilities for detecting bad sectors.

650x300xwindows-disk-error-checking.png.pagespeed.gp+jp+jw+pj+js+rj+rp+rw+ri+cp+md.ic.6ySij9BMdA.jpg


Bad sectors are just a reality of hard disks, and there’s generally no reason to panic when you encounter one. However, you should always have backups of your important files just in case a freak bad sector strikes — and rapidly developing bad sectors can certainly suggest oncoming hard drive failure.
 

Prilozi

  • upload_2016-6-29_21-12-45.jpeg
    upload_2016-6-29_21-12-45.jpeg
    2,9 KB · Pregleda: 3
ADMINISTRATOR
Učlanjen(a)
11.10.2009
Poruka
66.917
Bad sector repair software
This article is devoted to teaching you how to detect and repair bad sectors and how to recover data when the hard disk has bad sectors by using bad sector repair software.

A bad sector is a sector on a computer's disk that cannot be used due to permanent damage (or an OS inability to successfully access it), such as physical damage to the disk surface (or sometimes sectors being stuck in a magnetic or digital state that cannot be reversed) or failed flash memory transistors.

Something weird will happen if the hard disk has bad sectors, for instance, operating system can't boot normally; hard disk can't be formatted; when you open a file, error is reported. These phenomena show that there must be bad sectors on the disk. In fact, it is very common that disk used for a long time has bad sectors.

Bad sector repair software
PartitionGuru Free is able to check and repair bad sectors for hard drives and other storage devices. Meanwhile, it is free partition manager and data recovery freeware, which is trusted and recommended by millions of users. The following screenshot is the main interface of newly updated PartitionGuru:

free-partition-manager.png


Free download PartitionGuru Free now!


Detect bad sectors

Start this bad sector repair and detect software and right click the disk that needs detecting bad sectors, and then select the item "Verify or Repair Bad Sectors", as below:

bad-sector-repair-software-02.png


Click the button "Start Verify" on the interface bad track verification and then PartitionGuru starts to verify bad sectors.


bad-sector-repair-software-03.png


While verifying bad sectors, PartitionGuru displays detailed information of hard drive sectors:

bad-sector-repair-software-04.png


Bad sector repair
You can click the button "Repair" to fix bad sectors. For more information about bad sector repair software and bad sector repair, please refer to the PartitionGuru online help Verify and Repair Bad Sectors

Important

The bad sector repair destroys data on the disk; more exactly, it destroys data on bad sectors or near bad sectors. Thus, you need to back up data before the bad sector repair. PartitionGuru reminds users this in a clear way, as below:

bad-sector-repair-software-01.gif


bad-sector-repair-software-05.gif


It is common that the disk can't read data due to bad sectors, and in such a condition, you need to recover data first instead of doing the bad sector repair.

Besides, the bad sector detection conducted by PartitionGuru doesn't do any harm to data, so you can use it without worries.

PartitionGuru itself is a piece of excellent data recovery software, so you can use it to recover data when the hard disk gets bad sectors. For more detailed information about this data recovery software and partition manager please go to: http://www.eassos.com/partitionguru.php

More on bad sector
Why bad sectors come up?
One of the reasons is that hard disk has bad sectors when it is manufactured; experienced data recovery engineers know which disk is likely to have bad sectors judging by its brand, manufactured time, working hours, etc. Another reason is the improper operations such as unduly defragment.


Fix bad sectors timely and use the disk with cautious
It'll become a vicious circle if you don't fix bad sectors timely, because that may cause more bad sectors. Therefore, you'd better detect bad sectors regularly and do bad sector repair timely. Meanwhile, though bad sectors are fixed, the disk is more risky of getting bad sectors than normal ones. So you should be cautious when you use a disk that had bad sectors before and do not save important data on it.


Logical and physical bad sectors
There are two types of bad sectors, logical bad sector and physical bad sector. The logical bad sector can be fixed, while the physical bad sectors can't be repaired, but usually they can be remapped. Bad sector repair and detect software can detect bad sectors, repair logical bad sectors and remap physical bad sectors.


Low-level formatting (LLF) and bad sector repair
Low-level formatting can be used to fix server bad sectors. However, the low-level formatting is a double-edged sword; it can fix bad sectors as well as do hard to hard disk, especially when the hard disk has physical bad sectors. Thus the low-level formatting is the last choice of bad sector repair.


Bad sector and new disk
It is barely known that when a hard disk is manufactured, there are areas on the platter that have bad sectors! These bad sectors, hidden in P-LIST and G-LIST, won't affect normal use and they can't be accessed by common software either. G-LIST can store several hundred bad sectors and the P-LIST can store about four thousand bad sectors. For more information about G-LIST and P-List, please read related articles.
 
ADMINISTRATOR
Učlanjen(a)
11.10.2009
Poruka
66.917
Scanning a Disk for Bad Sectors
Every operating system has tools to scan a disk for bad sectors. Some are automatically invoked during startup if the computer detects an improper shutdown. For example, Windows maintains a “dirty bit” in the Master File Table (MFT) on NTFS volumes or the File Allocation Table (FAT) on FAT16/32 drives.

During boot, the autochk program looks for this value and if it is set, it will run an abbreviated version of the actions performed by chkdsk on all volumes flagged. A similar process is used by other modern operating systems.

Windows
For those who are not afraid of the Windows command line, chkdsk /r or chkdsk /b can be run at any time to look for bad sectors. It will run other tests first to verify the consistency of the drive’s metadata before the optional bad sector pass. Depending on the size of the volume in question and the number of directories and files, it can take quite some time to complete. The difference between the two commands is the second one will re-evaluate sectors that are already flagged by the operating system as bad.


Windows also has a GUI tool that can be used to perform the same checks. It can be accessed by opening Windows Explorer > right-click the drive to check >Properties > Tools tab > Check now… > check “Scan for and attempt recovery of bad sectors” > Start.

windows-disk-check.png


No matter which one you choose, if you are scanning a system or boot drive, it will require exclusive access to the volume and ask you if you want to schedule the scan on the next restart. If it is not a system drive, the scan should begin immediately unless another process has already locked it for exclusive access.

This tool does not mark individual sectors bad; it marks the entire cluster as bad in the MFT or FAT and relocates the entire cluster to another unused cluster on the drive. This can happen if the drive hardware cannot remap the bad sector for any reason such as its spare sector pool has been exhausted.


Linux
Although the badblocks program can be used to search for bad blocks (sectors) on a disk partition on Linux systems, I recommend you use e2fsck -c instead or the appropriate fsck variant for the filesystem you are using. This ensures that the proper parameters are passed to the badblocks program.

Incorrect parameters can cause irreparable damage to the filesystem. The -cparameter performs a read-only test on the volume. If you want to use a non-destructive read-write test, you need to specify the -cc parameter instead.

e2fsck-complete.png


When using -c or -cc, the entire bad blocks list is rebuilt. If you wish to keep the existing entries in the list and merely append new blocks to the list, add the -k (keep) option. If you suspect there has been damage to the drive itself and/or the filesystem, you may also want to add the -p (preen) option which will attempt to automatically repair any damage. It will notify you if it cannot fix errors it finds.


Manufacturer Tools
Drive manufacturers have their own diagnostic software that may be used to perform surface analysis and control features specific to their drives. Western Digital has Data Lifeguard for Windows for their drives while Seagate has SeaTools for Windows which can be used to test Seagate, Maxtor, and Samsung drives.

Both offer options for testing and repairing their associated drives but you need to be careful about what tests are destructive and which are non-destructive. In either case, you should still have a current backup before proceeding.

data-lifeguard.png


Third-party Tools
There are also third-party tools such as SpinRite from Gibson Research Corporationthat access the drive below the operating system level in order to perform their magic. It bypasses BIOS and interacts directly with the hard drive controller. It is primarily for data recovery but can also be used to perform surface analysis and verification prior to putting a new drive into service.

SpinRite does have its limitations. Because it runs on the FreeDOS operating system and it uses CHS to access the drive, it can only access the first 228 (268,435,456) sectors. So a drive that uses 512 byte sectors will be limited to 128 GB and a drive using 4K sectors will be restricted to 1 TB.

By setting it up on a bootable disk using the Windows 98 DOS 7 command interpreter, SpinRite 6 can theoretically test the entire drive.

Are Bad Sectors Repairable?
Physical defects from manufacturing, head crashes and most other faults detected by the hard disk controller generally cannot be repaired. Those that have been isolated by the operating system are another story.

hard-drive-repair.jpg


Operating System Tools
It is sometimes possible to recover blocks or clusters that have been marked as bad by the operating system. Since a cluster is normally several sectors and a single bad sector will get an entire cluster marked as bad, it is occasionally possible to recover those clusters.

This is because the hard drive controller may not have dealt with the bad sector before the operating system had a problem with it. Remember, the drive generally doesn’t know something is wrong until it cannot read the sector and it does not attempt to remap the sector unless there are numerous failed reads or a write is attempted to that sector after a failed read.

If the hard drive controller has reallocated the bad sector after the operating system marked the containing cluster as bad, re-running the appropriate command to re-evaluate the bad blocks (chkdsk /b for Windows, e2fsck -cc for Linux – you must not use the -k option here since it would keep the current list of bad blocks) should clear it from the list.

SpinRite
SpinRite is one of the tools that claims to be able to recover weak sectors. Even with three decades of working with technology, this is something I am unwilling to trust. The sector was originally marked as bad by the drive controller (or the containing cluster was marked by the operating system) because data could not be reliably read from it. Even if its ability to retain data can be improved, it is likely to be temporary which should bring a couple questions to mind.

  1. How temporary is this repair?
  2. Are you willing to trust your data to this sector?
Personally, this is one area where I am unwilling to tread. Much of my data is too important.

Monitoring Drive Status
One of the two best ways to protect the data you have stored on your drives – if you haven’t discerned it from previous comments – is to ensure you have implemented a reliable backup plan.

The other is using software to monitor the status of your drives. Modern hard drives include Self-Monitoring, Analysis and Reporting Technology (SMART) to help determine the health of the drive and predict failures.

Ubuntu, RedHat, and their derivatives have the Disks utility as part of their default installation. It allows you to access the most important SMART counters as well as run both the short and extended SMART tests. There are also command line tools such as smartctl which can be used to automate checking and reporting of drive status.

Windows does not supply this capability so we need third-party tools such asCrystalDiskInfo and Hard Disk Sentinel to handle the job.

SMART Counters
Don’t freak out when you see the values being reported by these tools. The threshold value is set by the manufacturer to indicate when it will be considered a problem. The current normalized value is likely to be higher than the worst reported value and for most counters this is expected. The normalized values which range from 1 to 253, although some manufacturers will choose a starting point of 100 or 200 for some attributes, decrease from a higher starting point over time and it isn’t necessarily a problem until it goes below the threshold value.

hdd-sentinel-failing-drive.png


No matter what tool you choose to use to monitor your storage devices, there is a short list of counters you should be concerned with provided your drive supports them:

  • Counter 5 (Reallocated Sectors Count) is a total count of sectors that have been reallocated and placed on the G-LIST since it was put into service. This does not include the sectors that were flagged at the factory. The raw data is a true count so lower is better.
  • Counter 10 (Spin Retry Count) indicates how many times the drive needed to try to spin up the drive until it reached operational speed if the first try was unsuccessful. Increases in this attribute indicate mechanical issues with the drive or a possible power problem.
  • Counter 187 (Reported Uncorrectable Errors) is the number of ECC errors that could not be fixed by the drive controller. Lower is better when looking at the raw value.
  • Counter 188 (Command Timeout) is the number of aborted operations on the device. This is commonly a result of problems with the power supply or data cable connection issues. Again, the raw data value should be low.
  • Counter 195 (Hardware ECC Recovered) is a vendor-specific implementation so the values may not always represent identical conditions. In general, it is a count of the number of times ECC correction was required to return the correct data from the drive.
  • Counter 196 (Reallocation Event Count) represents the number of times sectors have triggered a remap event by the controller. It counts both successful and unsuccessful attempts to remap sectors. It is not supported by all manufacturers.
  • Counter 197 (Current Pending Sector Count) is the number of sectors that are currently marked as unstable and will be remapped if its next read attempt is successful or when it is next written. This counter is decremented once the sector has been successfully remapped.
  • Counter 198 (Offline Uncorrectable Sector Count) is the total count of errors when reading or writing sectors. If this starts going up, there is a problem with the disk surface or the mechanical subsystem.
Taken by themselves, many of the counters available don’t offer much insight into the overall health of your drives. But when they are taken together, paying particular interest to the ones listed above, you are more likely to spot negative trends so you can prepare for the drive’s inevitable demise.

Conclusion
Even though there are tools available to help predict how much life may be left in your storage devices, it does not obviate the need for a solid, tested backup plan.There is evidence that a large number of drives will fail without a single SMART error appearing in its entire history. In the same report, it also shows a high correlation between some of the SMART errors listed above and an extremely abbreviated lifespan of the device.

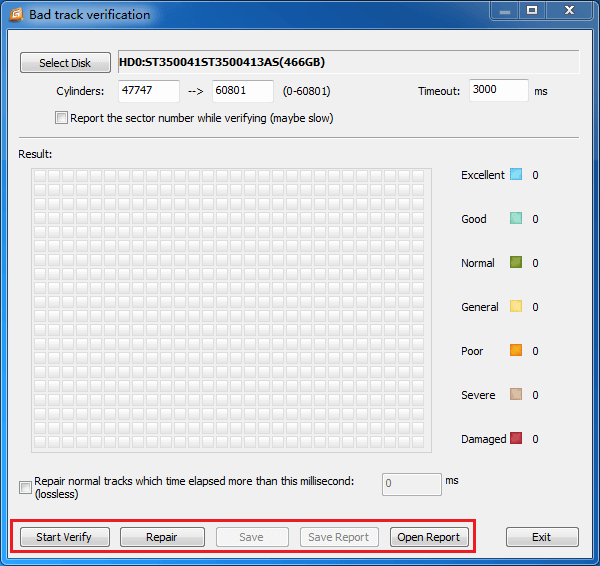
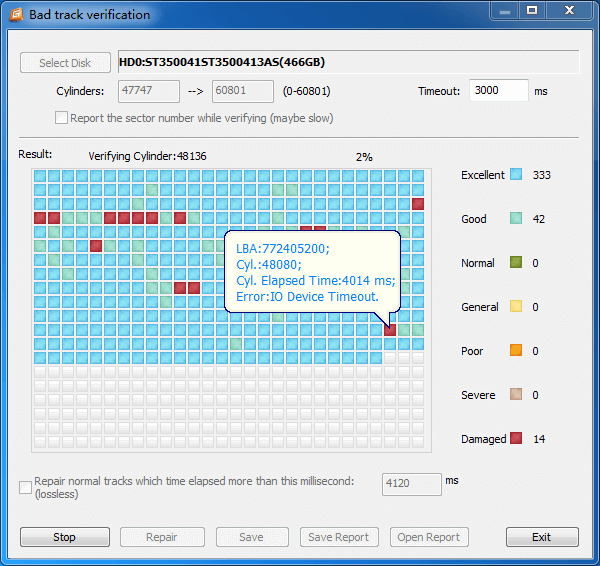
For example, the bad sectors indicated in the image above are from a drive that Hard Disk Sentinal Pro estimates has 21 days of life remaining. Two months ago it was reporting 30 days and I am still waiting to see how much longer it will go before it finds its way to data heaven. So it does show that predictive analysis, while indicating that data is at risk, still cannot accurately give a reliable idea of how much time it has remaining.

Even though the bad sector count has not increased in months and using HDD Regenerator on the drive to see if it could revive those 77 bad sectors didn’t help, the overall health has still decreased somewhat. It’ll be interesting to see how much longer it survives.
 
Natrag
Top