How to Make Google Chrome Fast Again

ADMINISTRATOR
Učlanjen(a)
11.10.2009
Poruka
66.908
If you are using Google Chrome web browser and if you are facing slow performance issues, this tutorial will definitely help you.

Recently Google updated its web browser Chrome to version 36 and many people who upgraded their web browser, started facing various problems such as following:

  • Chrome is running very slow
  • Websites are loading at sluggish speed
  • Keyboard lag while typing in textboxes
  • Glitches in scrolling in webpages
  • Tabs are not opening, just showing "Loading..." text in titles
  • Overall performance issues
Many Chrome users reported that the browser was running very slow for them and many websites were loading at sluggish speed. Also many people reported that when they open new links in background using Ctrl+Click shortcut, the tabs don't start opening the websites. All tabs just show "Loading..." term in their titles until users manually go to each tab and make it active. Once the user clicks on an inactive tab, it starts opening website properly.

Some Chrome users have also reported that they are having many lags and glitches while typing or scrolling in webpages.

So basically many Chrome users have faced poor performance issues in Google Chrome new version. We found that a single solution can fix all these performance related issues in Chrome.

The culprit behind all these problems in Google Chrome is "Hardware Acceleration" feature. When this feature is enabled, it may cause such kind of performance issues in many computer systems whether they are running Windows or Linux operating system.

If you are also facing similar performance issues in Chrome and want to speed up your web browser, check out following simple steps to fix these problems:

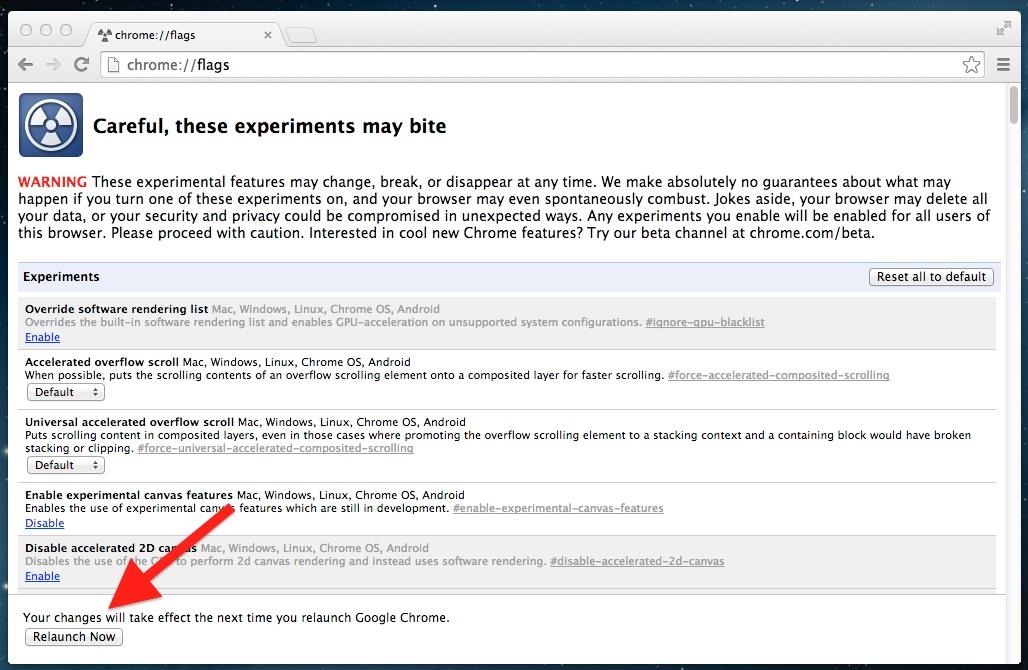
1. Open Google Chrome web browser and click on Control button -> Settings option. Alternatively, you can directly open the Settings page by typing chrome://settings/ in Chrome address bar.

2. It'll open Chrome Settings page. Scroll down to bottom and click on "Show advanced settings..." link.

3. Again scroll down to bottom and you'll see "Use hardware acceleration when available" option present under "System" section. Uncheck the option and restart Chrome.

Disable_Hardware_Acceleration_Google_Chrome.png


That's it. Upon restart Chrome should run smoothly without any problem and you should not face any typing or scrolling problems in websites.

Thanks to our reader "ulupoi" for sharing this solution...

If you can remember similar problems have been faced by many people in other software such as Mozilla Firefox, Internet Explorer and Microsoft Office when Hardware Acceleration feature is turned on:
 
ADMINISTRATOR
Učlanjen(a)
11.10.2009
Poruka
66.908
Have you noticed your usually speedy Google Chrome browser slowing down, or even crashing on you? Unnecessary plugins, extensions, and even browsing data can slow your browser down to a crawl, or make it crash. Here’s how to fix it.

In this article, we’ll show you how to disable plugins and extensions and clear browsing data to speed up Chrome and prevent it from crashing on you.


Disable Plugins
By default, when you install Google Chrome, many unnecessary plugins are installed and enabled. Plugins help Chrome process special types of content, such as Flash, Java, Silverlight, or Windows Media files, but most of them aren’t even important to your daily browsing. Plugins can slow down the performance of Chrome, but you can disable plugins you are not using. To do this, type “about:plugins” (without the quotes) in the address bar of Chrome and press Enter.


NOTE: You can safely disable every single plugin, but you may want to keep Flash enabled, as a lot of sites use Flash to display menus, show videos, etc. Also, if you watch Netflix in Chrome, you need to keep the Silverlight plugin enabled. You can always enable a plugin again if you need to.

584x217x01_entering_about_plugins_in_address_bar.png.pagespeed.ic.2I_pOpg7IZ.png


A list of installed plugins displays on the current tab. Scroll through the list and click the Disable link for each plugin you feel you don’t need.

NOTE: Plugins cannot be deleted or uninstalled, only disabled. An exception would be a plugin that was installed as part of an extension and you uninstall the extension. Then, the plugin is automatically removed.

547x408x02_disabling_a_plugin.png.pagespeed.ic.Ty2ArQG0RU.png


Disabled plugins turn gray in the list, and the Disable link for each disabled plugin becomes an Enable link, allowing you to enable the plugin again, if desired.

554x422x03_enabling_a_plugin.png.pagespeed.ic.foOUz8LEGu.png


Disable Extensions
Extensions are small programs available in the Chrome Web Store that add extra features and functionality to Chrome. They can be very useful, but if you end up with a lot of extensions installed, the browser’s speed may be negatively affected. You can easily disable extensions without uninstalling them to gain some speed.

Some extensions install a button on Chrome’s address bar, and those can be quickly removed (Uninstalled) by right-clicking on them and choosing Uninstall from the menu.

539x166x04_extensions_on_toolbar.png.pagespeed.ic.MhVLrRWDEE.png


You can also install apps in Chrome, that are accessible on the New Tab page. These can also be disabled.

650x415x05_games_on_new_tab_page.png.pagespeed.ic.dhlHAQfyGD.png


To access your list of installed extensions and apps, click the wrench icon on the toolbar and select Tools -> Extensions from the drop-down menu. You can uninstall extensions with buttons without accessing this list, but you might be surprised that some extensions are in the list that don’t have a button.

652x550x06_opening_extensions_list.png.pagespeed.ic.Y3VlJP4WYs.png


To disable an extension, click the Enabled check box to the right of the extension’s title in the list so there is no check mark in the box.

650x360x07_disabling_an_extension.png.pagespeed.ic.bmkUmVRzU0.png


The Enabled check box becomes an Enable check box, allowing you to re-enable the extension at any time.

NOTE: You can also easily remove any extensions or apps you don’t want anymore by clicking the trash can icon to the right of the Enabled check box.

652x157x08_remove_from_chrome_link.png.pagespeed.ic.u7QO3prtkX.png


Notice that there are a lot less extensions on our toolbar now.

304x164x09_less_extensions_on_toolbar.png.pagespeed.ic.xnowQ2Ua1f.png


Clear Browsing Data
As you browse the web, Chrome’s history database collects URLs and cached texts for websites you’ve visited, your download history, cookies, and other website and plugin data. While the point of the history and cache database are to speed up your computer by caching things locally instead of having to download every time, sometimes the history database can become very large and may slow down Chrome.

NOTE: You shouldn’t clear your history regularly for speed purposes, as that defeats the purpose of a local cache. You can certainly clear it for privacy reasons though, or if you are having an issue with a particular site.

There are several ways to clear your browsing history, including clearing your entire history and clearing the history for specific sites.

Clear Your Entire Browsing History
To clear your entire browsing history, click the wrench icon on the toolbar and select Tools -> Clear browsing data from the drop-down menu.

NOTE: Clearing your entire browsing history prevents matches from displaying when you start typing URLs in the address bar.

652x552x10_selecting_clear_browsing_data.png.pagespeed.ic.g2496evY9h.png


In the Clear browsing data dialog, select the items you want to clear and select a time range from the drop-down list. Click Clear browsing data to clear the selected data.

593x346x11_clear_browsing_data_dialog.png.pagespeed.ic.mKw26ldOVB.png


When the Clear browsing data dialog closes, the Settings tab opens. To close it, click the red X button on the tab.

560x284x12_closing_settings_dialog.png.pagespeed.ic.Y29bXI_6xG.png


Clear Specific Items from Your Browsing History
If you want to delete the history for only specific webpages, click the wrench icon on the toolbar and select History from the drop-down menu.

366x567x13_selecting_history.png.pagespeed.ic._6xcCGR5Ip.png


Move your mouse over a webpage you want to remove from the history list and select the check box that displays. Once you have selected all the webpages you want to remove, click Remove selected items.

650x398x14_removing_selected_items.png.pagespeed.ic.G5PhUhu3B6.png


A confirmation dialog box displays. Click OK if you are sure you want to remove the webpages from the history list.

371x192x15_delete_history_confirmation.png.pagespeed.ic.O3a5pYVvMu.png


To close the History tab, click the red X button on the tab.

512x236x16_closing_history_tab.png.pagespeed.ic.gDFo1fNsWv.png


Clear Your Browsing History from the New Tab Page
The New Tab page displays thumbnails for the websites you visit most (depending on the version of Chrome you are using). You can clear your browsing history by removing these thumbnails from the New Tab page.

To remove a webpage from the New Tab page, move your mouse over the thumbnail for the site and click the X that displays in the upper, right corner of the thumbnail.

NOTE: You can reset the New Tab page to blank thumbnails by clearing your entire browsing history, as mentioned earlier.

554x562x17_removing_site_from_new_tab_page.png.pagespeed.ic.OEXcjPwkUU.png


You can also remove a thumbnail from the New Tab page, by dragging it to the Remove from Chrome trash can, which only displays once you start dragging a thumbnail.

434x258x18_dragging_site_to_remove_from_chrome.png.pagespeed.ic.v9QkdEVzes.png


Run the Google Software Removal Tool
Google just launched a new tool that will help you clean up your Chrome browser from anything that is interfering with normal operation. This can include malware and spyware that infects your Chrome installation and makes things much slower than it should.

All you need to do is navigate to www.google.com/chrome/srt/ and click the Download now button.

ximg_5432e183157d0.png.pagespeed.ic.2XIqGS2MFV.webp


When it restarts it’ll ask you to reset your browser, which can be really helpful in preventing crashes and other problems.


Scan for Malware and Spyware
Unlike your antivirus software, which will usually happily allow spyware to take over your computer, an anti-malware solution will actually find, remove, and block spyware that invades your browser.

How does this apply to a Chrome speed problem? Because a lot of the spyware causes instability in your browser, which then causes other problems.

We recommend scanning with Malwarebytes and using that to remove all of the problems. It’s completely free to use, although they do have a paid version with more features like real-time blocking of spyware.

ximg_544821e15de6a.jpg.pagespeed.ic.CqzyrxSNGP.webp


Using it couldn’t be more easy — download, install, scan, and then click the Apply Actions button to remove all of the malware. Just like vacuuming inside of your couch cushions, you’ll be shocked at how much nonsense you’ll find.
 
ADMINISTRATOR
Učlanjen(a)
11.10.2009
Poruka
66.908
If you are experiencing slow page loading and choppy scrolling in your Chrome browser, especially after opening several tabs at a time, there is a fix to solve the issue. By default, Chrome browser uses 128MB of memory, but by increasing this value, you can improve your browser’s performance, especially on your Android phone.

chrome-settings.png


2. Now, click the Default button under “Maximum tiles for interest area”. Select either 256 or 512MB RAM option. Close Chrome browser and relaunch it.

Done! You can now enjoy faster and smoother performance while browsing the web, especially on your Android. You can also see the difference in Windows, Mac, and Linux computer.
 
ADMINISTRATOR
Učlanjen(a)
11.10.2009
Poruka
66.908
Calling all Chrome users: Does your browser seem slow of late? I may have a solution for you.

First, a little back-story. I run a Samsung Series 9 Ultrabook with a Core i5 processor and Windows 8.1. I've had it about 18 months, and I know from years of experience that, over time, PCs slow down.

Usually I point the finger at Windows, because whenever I've taken the drastic step of wiping my hard drive and reinstalling the OS from scratch, I get a blissfully speedy system again. For a while.

But in the past few months, I've noticed that my Web browser, Google Chrome, has really gotten slow. (I can't be positive, but I think the timing coincided with Microsoft's required update to Windows 8.1 fromWindows 8, which happened in October. That's my conspiracy-theorist explanation.)

Although Chrome itself would open quickly, tabs seemed to take forever to load. When I opened a new tab and typed in an address (or even clicked a bookmark), there was often a delay of several seconds before anything would happen -- I'd just be staring at a blank tab for what seemed an eternity.


Needless to say, I tried removing most of my Chrome extensions, even the ones that seemed like they couldn't possibly impose a performance hit (like my beloved OneTab). I tried deleting my browsing history, cached files and other behind-the-scenes detritus. Nothing helped.

This got aggravating to the point where I thought, "Well, maybe it's time for an upgrade." Which is ridiculous because this laptop has all the horsepower I need. It's just the browser that's killing me.

I even went so far as to spend a day working in Firefox, just for sake of comparison. And you know what? Huge difference. So the problem wasn't Windows, necessarily -- it was Chrome.

OK, enough history, now for the fix: After some research and experimentation, I tweaked one setting that made Chrome run considerably faster. Your mileage may vary, of course, but this is worth a try:

chrome-menu-and-settings.jpg

Screenshot by Rick Broida/CNET
Step 1: Click the Menu button (top-right corner of the browser, below the Close button), then click Settings.

Step 2: Scroll down and click "Show advanced settings," then scroll down further until you find the System section.

chrome-disable-hardware-acceleration.jpg

Disabling hardware acceleration may give Chrome a big performance boost.Screenshot by Rick Broida/CNET
Step 3: Clear the check box next to "Use hardware acceleration when available."

Step 4: Shut down Chrome and restart it.

Again, I can't say for certain this will solve your Chrome performance issues, but it made a noticeable difference on my system.

Whether it's successful or not, hit the comments and let your fellow Chrome users know the results! And if you've found other ways to get the browser back up to speed, share those as well.
 
ADMINISTRATOR
Učlanjen(a)
11.10.2009
Poruka
66.908
Method 1: Using flags setting to make Google Chrome faster:
Your Google Chrome browser has a hidden browser feature known as “flags” that can be used for testing purposes and improving the performance of Google Chrome.

These features are experimental and they may change, disappear or break anytime. So, as soon as you proceed with this method and open the flags in your Google Chrome browser to make it faster, Google shows the following message as a warning:

These experimental features may change, break, or disappear at any time. We make absolutely no guarantees about what may happen if you turn one of these experiments on, and your browser may even spontaneously combust. Jokes aside, your browser may delete all your data, or your security and privacy could be compromised in unexpected ways. Any experiments you enable will be enabled for all users of this browser. Please proceed with caution.

However, the steps we are going to mention ahead, are not much to be worried about and you can hack you Google Chrome browser to increase its speed and overall performance. If you notice any glitches, you can always revert back the changes with the same simple steps mentioned ahead.

Take a look at these steps to change the “flags” settings in Google Chrome to make it faster than ever: (Click to enlarge the images)

1.Type chrome://flags/ in the search bar of Google Chrome to open the flags page. Here you can see tons of things to change and create a havoc in Google Chrome. But, proceed carefully and don’t change any setting on your own.


2. Search for Maximum tiles for interest area and set it to 512. This step actually increases the RAM that Chrome is allowed to use and thus makes your Google Chrome a lot faster.

It’ll be easier to locate the items in flags if you perform the search using Ctrl+F in Windows and Cmd+F in Mac as the items in flags are not much organized.


3. Search for Number of Raster threads and set it to 4. This small modification increase rendering speed of images in Chrome and improves the Google Chrome performance.


4. Search SPDY/4 and set it to Enable (You might not find this option, as Google changes its protocol from SPDY to http/2). This will speed up page loading by making web transactions faster to speed up Google Chrome.


5. Find Enable fast tab/window close and set it to Enable. Enable this change if you want to close any window or tab faster.


6. To make Google Chrome faster on touch screens computer, search for Touch Events and Enable it. This will increase your Google Chrome speed drastically.


Method 2: Google’s prerendering suggestion to make web pages load faster
In a blog post, Google explains the method of prerendering the links that can make your Google Chrome faster. Actually, while browsing, Chrome predicts the links you might click and it prepares them to load instantly for you.

For example: If you are on a web page and there’s a read more or next page link, Google Chrome intuitively prerenders the web page and serves it instantly as you click on it. Also, by enabling this option for increasing the Google Chrome speed, you browser predicts the web pages you might enter in the address bar and shows them as you hit enter. Chrome does this by looking at your browsing habits.

Here’s the way to turn on these network action predictions:

On you PC:

1. Click on the hamburger
tgmsrPRh34tM4q0WYv7l-NNXDz7dqm7ftk8TyCEguoY30xkEg8lcw_ULI23ki9Q=w18-h18
symbol located at the top right corner of your Chrome browser to open the settings.

2.Go to Settings and then click on Show advanced settings.

3. Now in the privacy section check Prefetch resources to load pages more quickly.

On your Android device:

1. Tap on the Chrome menu and open Settings.

2. Under Advanced, find Privacy and open it.

3. Now look for the option Prefetch page resources.

4. You’ll be greeted with following options, choose the desired one to make your Google Chrome faster:

  • Always: Chrome will always preload webpages even when you’re using mobile data. This way, you may end up using a large chunk of mobile data.
  • Only on Wi-Fi: Chrome will only preload webpages on Wi-Fi network. This is the default option.
  • Never: If you are using a very limited data plan, select this to stop Google Chrome from preloading the web pages.
 
ADMINISTRATOR
Učlanjen(a)
11.10.2009
Poruka
66.908
Get Rid of What You Don’t Need
These tips and tricks disable various unnecessary and unneeded features of Chrome to allow the browser to load web pages faster. These include extensions, plugins and web apps you don’t need.

1. Disable Avoidable Extensions
Extensions are tools that extend the functionality of the Chrome browser, which are helpful yet some may actually be less helpful than you think. Extensions mostly run in the background, and parse or filter web pages before they’re displayed on the screen, but will also load their own pack of data from the Internet.

To get better browsing speeds and good response times, disable and/or delete extensions you don’t actually need.

To disable extensions you do not need:

  1. Type “chrome://extensions” in your Chrome’s location bar. Alternatively, you can go to Chrome’s Options > More tools > Extensions.
  2. Untick the Enabled to the extensions you want to disable, or click the Trashicon to delete the extension.
1-extensions.jpg

2. Disable Unnecessary Plugins
Plugins are much like extensions. They provide extended functionalities to the browser. Chrome comes with few built-in plugins provided by Google (like Chrome PDF Viewer, Native Client, etc.), and may carry plugins by other software installed in your computer. Plugins, like extensions, can slow down the browser and clog memory and network resources.

To disable plugins you do not need:

  1. Type “chrome://plugins” in your Chrome’s address bar.
  2. Click Disable to disable the plugin you no longer need.
2-disable-unnecessary-plugins.jpg

3. Remove Unnecessary Web Apps
Google Chrome is not just a web browser. It’s also an application platform for web apps. It can run locally-installed web apps written using HTML5, CSS, and JavaScript. While web apps don’t load resources like websites do, if you don’t need them, shed them.

To remove unnecessary web apps:

  1. Type “chrome://apps” in your Chrome’s address bar or click Apps on the Bookmarks bar
  2. Right-click the app you want to remove, select Remove from Chrome…, and click the Remove button to confirm the removal
3-remove-needless-apps.jpg

4. Enable Prefetch Resources
Google Chrome comes with many intelligent features such as network prediction, spelling correction, resource preloader, etc. Resource pre-fetcher or preloader provides intelligent suggestions about the pages or links the user is most likely to open next, loading those pages/links in the background before you actually open them.

To enable the prefetch feature in Chrome browser:

  1. Head over to Chrome’s Options > Settings > Show advanced settings…
  2. Check the “Prefetch resources to load pages more quickly” option.
4-preload-elements.jpg

Enable Secret Hacks
Google Chrome packs many secret and experimental features under its hood. These are experiments by the Chrome’s developer team – some may not be built for novice users, some may not work for some devices, and some may not be good for your computer too.

But lucky for us there are some experiments that are useful enough to boost the browser’s page-loading and rendering engines.

6-secret-hacks-experimental-features.jpg

Again, some of them may not work for some devices, and if you find yourself in a situation like this, just undo the hack to go back to normal.

5. Experimental Canvas Features
Experimental Canvas Features allow the Chrome to make use of opaque canvases to amplify the loading times and boost performance.

To enable experimental canvas features:

  1. Go to “chrome://flags/#enable-experimental-canvas-features“.
  2. Click on Enable and then Relaunch Now button
experimental-canvas.jpg

6. Fast Tab/Window Close
The Fast Tab/Window Close option increases the response time of the browser when a user tries to close tabs or windows. Enabling this feature runs a tab’s onUnload.js handler independently of the graphical interface and speeds up the closing process.

To enable fast tab/window close feature:

  1. Type “chrome://flags/#enable-fast-unload” in the address bar
  2. Click on Enable and then Relaunch Now button
fast-tab-window-close.jpg

7. Scroll Prediction
Scroll Prediction feature tells the Chrome browser to predict the finger’s future position during scrolls allowing the engine to render the frame before the page is scrolled again.

To enable Scroll Prediction:

  1. Type “chrome://flags/#enable-scroll-prediction” in the location bar
  2. Click on Enable and then Relaunch Now.
scroll-prediction.jpg

8. Maximum Tiles
Maximum Tiles refers to the tiles for interest area. Increasing the maximum number of tiles allows Chrome to show more tiles based on your interests or browsing history, which allows you to quickly open a new website from the interest area.

To increase the number Maximum Tiles:

  1. Head over to “chrome://flags/#max-tiles-for-interest-area” in your browser
  2. Choose 512 from the dropdown. Click Relaunch Now.
maximum-tiles.jpg

9. Raster Threads
Raster Threads are responsible for rendering images in Chrome . Increasing the number of raster threads improves the image rendering time, and thus influences page loading time.

To increase the number of raster threads:

  1. Open “chrome://flags/#num-raster-threads” in Chrome.
  2. Select 4 from the dropdown menu and click Relaunch Now.
raster-threads.jpg

10. Answers in Suggest
The “Answers in Suggest” feature allows Chrome to show responses to certain types of queries (mostly questions) directly in the Omnibox’s suggestion list. After enabling this feature, you no longer need to wait for the page to load to see answers for your queries.

To enable Answers in Suggest:

  1. Type “chrome://flags/#answers-in-suggest” in the location bar.
  2. Select Enabled from the dropdown. Click Relaunch Now button.
11. Simple Cache for HTTP
Simple Cache is the new caching mechanism for Google Chrome. It works better than the old caching system, relying on the filesystem for space allocation.

To enable Simple Cache:

  1. Go to “chrome://flags/#enable-simple-cache-backend” in your browser.
  2. Select Enabled from the dropdown. Click Relaunch Now button.
simple-cache-for-http.jpg
 
ADMINISTRATOR
Učlanjen(a)
11.10.2009
Poruka
66.908
enable SPDY/4

This modification will speed up page loading by making web transactions quicker. Search for Enable SPDY, then click the little blue Enable link in the Enable SPDY row; its color should change from light grey to white and the blue link should now say "Disable."

10-speed-hacks-thatll-make-google-chrome-blazing-fast-your-computer.w1456.jpg


enable offline cache mode
10-speed-hacks-thatll-make-google-chrome-blazing-fast-your-computer.w1456.jpg


Enable Experimental Websocket Implementation

This feature provides a different way to deal with web traffic communication. Search for Experimental Websocket and click Enable.

10-speed-hacks-thatll-make-google-chrome-blazing-fast-your-computer.w1456.jpg

enable Touch Events

10-speed-hacks-thatll-make-google-chrome-blazing-fast-your-computer.w1456.jpg

enable Accelerated Overflow Scroll
10-speed-hacks-thatll-make-google-chrome-blazing-fast-your-computer.w1456.jpg

Enable Fast Tab/Window Close


10-speed-hacks-thatll-make-google-chrome-blazing-fast-your-computer.w1456.jpg


Enable Checking for Conflicts with 3rd Parties

10-speed-hacks-thatll-make-google-chrome-blazing-fast-your-computer.w1456.jpg


relaunch chrome
 
ADMINISTRATOR
Učlanjen(a)
11.10.2009
Poruka
66.908
How to Access the Flags Menu
Before we begin, it is important to understand that the flags are all experimental features that may or may not end up in future stable releases. With that in mind, it is very possible that they’ll disappear altogether at some point.

Secondly, because they are experimental, changing them could have unforeseen consequences for your browser’s general usability. Proceed with caution.

chrome-flags-580x500.png


The first step is to access Chrome’s secret flags menu – this is the place from which all the tweaks are made. Luckily it’s very simple – just type chrome://flags into the browser’s omnibox and you’ll be shown the list.

Hint: The list of flags seems to have no logical order. Use Ctrl + F to find the individual flags we discuss below.

1. Increase the “Raster Threads”
Raster graphics use pixels to form an image (as opposed to vector graphics, which use lines and curves). Virtually all websites use raster images, and raster threads are how a computer reads those images.Increase Image Resolution: Convert Raster Images to Vector Increase Image Resolution: Convert Raster Images to VectorREAD MORE

This is a great hack, therefore, for anyone who suffers slow-loading images on pages they visit.


raster-threads-640x140.png


Head to Number of Raster Threads and choose 4 from the drop-down list.

2. Prevent Tabs From Reloading
If you have a poor Internet connection that keeps dropping out, it can be annoying when pages that failed to load suddenly all refresh at the same time, using up precious bandwidth.How to Fix Your Wireless Internet Connection in Windows How to Fix Your Wireless Internet Connection in WindowsAre you struggling to get a strong and stable wireless Internet connection? It could be the hardware or Windows itself causing the problem. Here are some troubleshooting tips.READ MORE

To prevent this from happening, search for Only Auto-Reload Visible Tabs and select Enabled. It will force Chrome to only reload the tab that you’re currently looking at.


offline-pages-640x107.png


To disable the feature completely, select Disabled and also select Disabled on Offline Auto-Reload Mode (the option directly above).

3. Improve Page Loading Times
If you find that web pages frequently take a long time to load, try enabling Experimental Canvas Features.

This will allow Chrome to use opaque canvases. In practice, that means Chrome can make certain assumptions that speed up the drawing of transparent content and images. For example, it can automatically remove everything underneath the canvas pixels because it knows it will not be seen.

chrome-canvas.png


4. Close Tabs Faster
Tabs and windows on Chrome can be closed more rapidly by running Chrome’s JavaScript handler independently from the graphical user interface. Although the “kill” process will still be continuing behind the scenes, the tab/window itself will be removed from your screen.The 10 Best Extensions For Chrome Tab Management The 10 Best Extensions For Chrome Tab ManagementIf you’re a multi-tasker like me, you love tabs. Perhaps a little bit too much, as it’s easy to suddenly find you have a buffet of tabs available, but you’re no longer quite sure what...READ MORE

chrome-fasttab.png


You need to find the setting for Fast Tab/Window Close and click on Enable.

5. Low-Priority iFrames
An iFrame (short for Inline Frame) is used by web designers to insert content from another source within a site. In layman’s terms, it is like a webpage within a webpage. Too many iFrames on a website can dramatically impact a page’s loading time.

They are typically used for adverts, plugins, and other non-native content.

chrome-iframe.png


Enabling this feature will allow Chrome to ascertain what it believes to be the most important iFrames and load them first. Adverts and other non-essential content will be loaded after the rest of the page is already being displayed.

6. TCP Fast Open (Only Available on Chrome OS and Android)
TCP Fast Open (TFO) is an extension that speeds up the opening of data channels between two endpoints.

It works by giving the browser a cryptographic cookie so it can re-authenticate itself before the traditional “three-way handshake” has been completed.

chrome-tcp2-640x69.png


In short – enabling this feature will allow data to start being sent/received more quickly.

7. QUIC Protocol
This is another data speed hack.

The QUIC (Quick UDP Internet Connections) Protocol was developed in-house by Google in 2012. It focuses on reducing bandwidth, latency, and congestion by decreasing the number of round trips needed when establishing a new connection.

chrome-quic.png


Although it remains an experimental feature, QUIC was submitted to the IETF for standardization in June 2015 – so it might be about to become more widespread.

8. “Stale-While-Revalidate” Cache Directive
“Stale-While-Revalidate” is a cache directive which tells the cache that a response can be served even if its max-age has expired (i.e. – it is “stale”).

This is possible for up to five minutes – anything after that will result in a blocking fetch. However, for a period of 60 to 300 seconds, the browser will display the “stale” response and do a background update to refresh the resource.

chrome-stale-cache2.png


The bottom line: better cache reuse, fewer blocking resources, and a faster browsing experience.

Confirming and Undoing Your Changes
Whenever you change a Chrome flag, you’ll need to reboot your browser before the changes take effect.

Just click on the large Relaunch Now button at which pops up at the bottom of your screen. All the pages you currently have open will be automatically reloaded, though we recommend that you save any work before proceeding.

chrome-relaunch.png


If you find that you’ve broken something but you’re not sure which setting caused the problem, you can easily restore all the flags to their default settings. Look for the Reset All To Default option in the top right-hand corner of the menu. Click it, and restart your browser.
 
ADMINISTRATOR
Učlanjen(a)
11.10.2009
Poruka
66.908
Do a Little Magic
Let’s pull up our sleeves, because we’re about to perform a little magic trick. You see, Google Chrome has a hidden feature specially reserved for geeks. I’m about to show you a very nifty trick that works for computers of all sizes. Let’s add a “Purge Memory” button to the browser, shall we?

Go to the shortcut you normally use to open Chrome. Right-click on it and click “Properties.” Under the “Shortcut” tab, you’ll see a textbox for “Target.” Let’s add something at the end:

--purge-memory-button
That’s all you have to do! Now, after you click “OK,” start up Google Chrome and press “Shift+Esc.” You’ll see the magic little button right here:


chrome-purge-memory.png


Every time you press that button, Chrome “magically” gets rid of some of its RAM usage.
 
ADMINISTRATOR
Učlanjen(a)
11.10.2009
Poruka
66.908
Disable Unnecessary Plugins
You will find many Unnecessary Plugins that you don’t use in your daily browsing or don’t actually need them at all. With time they are added by different Apps, and even when you install Google Chrome it also has some built-in Plugins. All you have to do is know where they are located and Disable them.

Image-1-640x461.png

Go to Address bar and type “about:plugins”, you can also just copy this (don’t use the quotes) and paste in the address bar and hit enter.

Image-2-640x461.png

In the opened page, you will see all the Plugins that are installed on your PC.

Image-4-640x461.png

You can just click on “Disable” on any Plugin to disable it and it will become gray.

It should be noted that disabling Plugins will have no harmful effect on your browser, only the feature of the Plugin will become unavailable. So make sure you only disable Plugins which you don’t require. As far as Chrome’s built-in Plugins are concerned, it is better to leave Adobe Flash enabled as many websites use it for showing content and Google update should be enabled to keep it updated.

Image-5-640x461.png
Image-6-640x461.png

You can also enable these Plugins whenever you need them. Just go to same page and click on “Enable” to enable the Plugin which you would like to use again.

Disable Unnecessary Extensions

Extensions are quite handy, they add different added features to chrome and can be downloaded from Google Web store However, it is actually quite easy to get carried away and end up installing all kinds of extensions. This also leads to installing unnecessary extensions and never disabling/deleting them again. The more extension you have, the slower Chrome gets, so you need to at least disable/delete unnecessary extensions to gain back some speed.

Image-7-640x461.png

Click on Menu in Chrome (it’s the three horizontal lines) and hover your mouse cursor over “More Tools” to bring out a side menu. From the Menu, click on “Extensions”.

Image-8-640x461.png

In the opened page, you will be able to see all the extensions installed in your browser. You can easily disable extensions by clicking on the check box on the right of the extension.

Image-10-640x461.png
Image-12-640x480.png

You can also delete an extension if you are not planning on using the extension in the future. Just click on the trash icon next to the “Enabled” option and from the prompt, click on Remove to delete the extension.

Image-13-640x461.png
Image-14-640x461.png

If you would like to use the extension again, you can just enable it again. Just click on the check box where it says “Enabled” on the extension and it will be enabled.

Clear Browsing Data
Chrome keeps a database of all the websites you visit and the text of the website in the form of cache. This data helps in making it faster by locally fetching data instead of downloading it again and again when you visit the same websites. However, when this data becomes large it, can lead to slowing down the browser.

Make sure you only delete browsing data when it is large enough and only if you think it is causing slow-downs or crashes. The data is there for a reason, if you start deleting it too often, it just defeats the purpose of having this feature to start with, and could slow down your browser. Doing it every now and then shouldn’t hurt, as the cache will be re-created again based on your recent habits.

Image-15-640x461.png

To clear your browsing data, Click on Menu in Chrome and from there click on “History”. You can also just press Ctrl+H to directly go to History.

Image-17-640x327.png

You will see all your browsing history in the next page. From there you can click on “Clear browsing data…” to see all the options.

Image-19-640x461.png

Just choose the data which you would like to delete and choose the time period to delete all the data after that specific time and then click on clear browsing data to delete all selected data.

Note that you can leave the cookies unchecked if you don’t want to lose current log-in sessions (you would have to re-log) and other things that are saved temporarily.

Image-20-640x377.png
Image-23-640x346.png

If there are any specific websites which you don’t want to delete then you can also delete data of a specific website. For this purpose, instead of clicking on “Clear browsing data…” just click on the check box next to each website which you would like to delete to check it and when you are done just come back to top again and click on “Remove Selected items” to remove them.

Use Experimental Settings of Chrome
Now, this setting is not a Chrome’s official setting, they are just experimental features with no guarantee of how they will affect your browsing experience. Some of these settings have a direct effect on the performance of chrome and can actually make it quite fast but they are not recommended. As there is no guarantee, we cannot say how they will affect your browsing experience. There is even a warning on the top of these settings that can tell what you should expect.

These settings can be reverted back any time you like if you see any glitches or experience any other issue. The impact they will have on the performance of your Chrome browser is quite noticeable, however.

We will only be tampering with settings that will affect the performance and if there is any negative effect it should be minor and can be easily fixed by disabling the settings again.

Image-24-640x461.png

First, we need to access these settings, just type or copy “chrome://flags” and type or paste it in the address bar of chrome.

On the next page you will see 100+ settings that you can change for different effects, but only 7-8 have an effect on the performance of the browser. We will only be changing settings that have less negative effect.

Image-27-640x461.png
Image-28-640x461.png

Now finding these specific settings can be quite hard, to make it simple you can just open “Find” by pressing Ctrl+F and type the name of the setting there to reach it. You can also click on “Find…” in the Chrome’s Menu at the top right corner of the screen to access this feature.

Change total number of Raster Threads

“Number of Raster Threads” is the keyword to Find.

Image-29-640x461.png

Change this number from “Default” to “4”, this will speed up the loading time of images in chrome.

Change Maximum Tiles

“Maximum Tiles” is the keyword to find. Set Maximum tiles to 512, it is the total amount of RAM that Chrome is allowed to use, increase it leads to making chrome fast. However, don’t change this setting if you have less RAM and you need to do other things on your PC while Chrome is on. Otherwise, Chrome will take extra RAM leading to decrease in the performance of other programs.

Image-30-640x461.png

Enable Experimental Canvas

“Enable experimental canvas” is the keyword to find. Using Opaque canvases this will boost performance and loading time of pages, just enable this feature. Opaque canvases require less compositing work, that’s why they are faster.

Image-31-640x461.png

Enable Fast tab/window close

“Enable Fast tab” is the keyword to find. If the windows and tabs that you close are not closing fast enough, then enabling this feature will help make them close faster.

Image-32-640x461.png

Enable SPDY/4

“SPDY/4” is the keyword to find. This will help increase the loading time of pages by making web transactions fast. Just enable this feature.

Image-33-640x461.png

When you have made all the tweaks click on “Relaunch Now” at the end of the screen (no need to scroll down) and click on it. The browser will shut down and relaunch while applying all the changes you made.

If you experience any negative changes then go back to the same page and try changing one of the mentioned changes back to default and see if it fixes it. Keep changing until you find the one which is having a bad effect. Although, in most cases you will not find any negative effects.
 
Natrag
Top