ADMINISTRATOR
- Učlanjen(a)
- 11.10.2009
- Poruka
- 66.917
Windows 7 automatically assigns drive letters to hard-drives, DVD-ROMS, and USB/External Drives, etc. as you install or connect them. If the default letters aren’t catching your fancy for whatever reason (I like to reserve Z: for my External Backup drive for instance), Windows has a built-in feature which allows you to change the drive letter assignment. You can change it to any letter of the English alphabet except A. Windows 7 reserves the A: Drive for the all but extinct legacy floppy disk.
How To Change Your Hard-Drive Letter In Windows 7
1. Click the Windows Start Orb and then Right-Click Computer and Click Manage from the context menu.

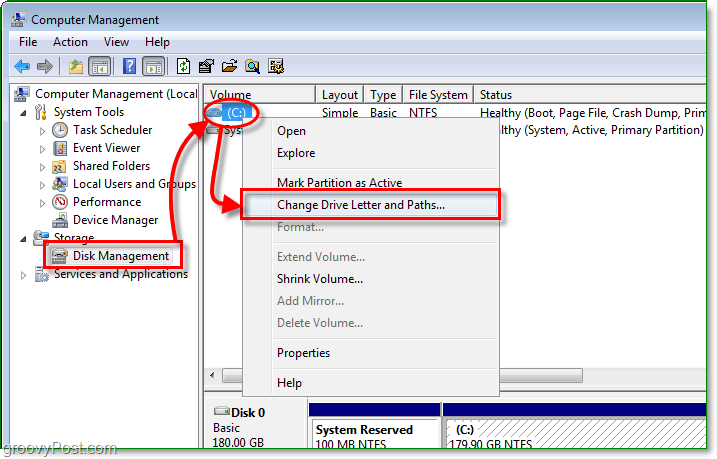
2. Click Storage > Disk Management from the left panel. Next Right-Click the drive letter that you would like to change and Click Change Drive Letter and Paths.

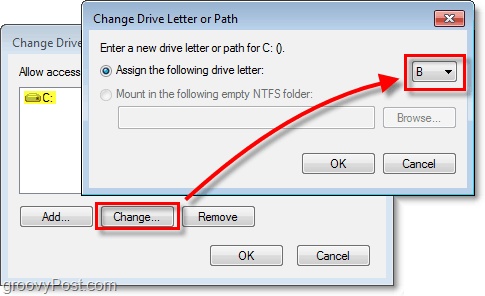
3. Select the drive letter you would like to change then Click Change. In the pop-up dialog use the drop-down box to Select a new drive letter. Click OK to save and exit both windows.

Now your drive should have the new letter you just assigned to it. Have fun with the groovy customization of hard-drive letters in Windows 7!
Note: A word of caution – In most cases changing drive letters is not a risky endeavor. However, if the drive you’re changing has software already installed on it, then changing that drive letter could break the installed applications.
How To Change Your Hard-Drive Letter In Windows 7
1. Click the Windows Start Orb and then Right-Click Computer and Click Manage from the context menu.

2. Click Storage > Disk Management from the left panel. Next Right-Click the drive letter that you would like to change and Click Change Drive Letter and Paths.

3. Select the drive letter you would like to change then Click Change. In the pop-up dialog use the drop-down box to Select a new drive letter. Click OK to save and exit both windows.

Now your drive should have the new letter you just assigned to it. Have fun with the groovy customization of hard-drive letters in Windows 7!
Note: A word of caution – In most cases changing drive letters is not a risky endeavor. However, if the drive you’re changing has software already installed on it, then changing that drive letter could break the installed applications.
